
Operating WAE RTTY with N1MM+
This tutorial shows how to send and receive QTCs in the Work All Europe DX Contest (WAEDC) on RTTY mode with N1MM+ Logger.
In the RTTY portion of the WAEDC, QTC traffic can be exchanged between any two stations that are on different continents to obtain additional points.
There is an excellent video created by Larry, K8UT, on the N1MM website. This is a must-see instructional video showing how to exchange QTCs using N1MM+. The video is located here.
- What is a QTC?
- Opening the QTC Window
- Receive QTC Window
- Send QTC Window
- QTC Setup Button
- Receiving QTCs
- Sending QTCs
- N1MM+ WAE Color Codes
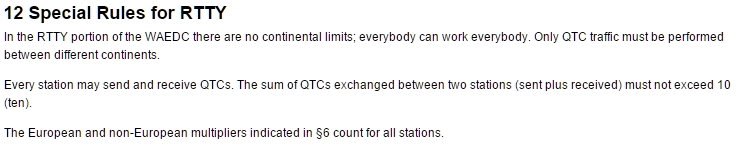
A QTC is a copy of the data from a prior QSO in your log. In the CW/SSB WAE contests, stations outside Europe can only send QTCs to stations in Europe. In the RTTY WAEDC, stations can send and receive QTCs with any other station outside their own continent. The definition of a QTC is shown in section 7 of the Rules.
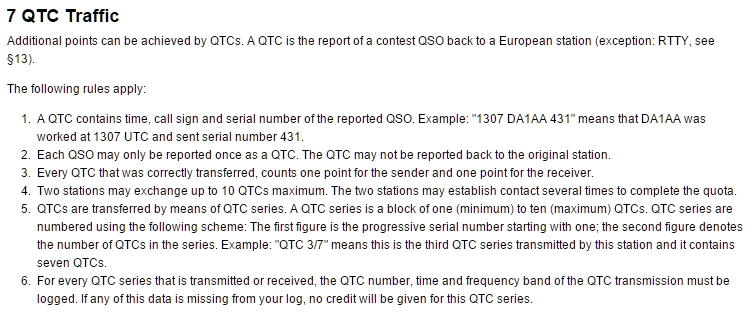
Additionally, the special provisions for RTTY are shown in section 12 of the Rules.
There are two QTC windows. There is one for Receive QTCs and one for Send QTCs. You open these windows by typing CTRL+Z (hold the CTRL key down, then press the Z key). When you type CTRL+Z once, the Receive QTC window opens as shown in Fig. A. When you type CTRL+Z a second time, it brings up the Transmit QTC window as shown in Fig. B. There is one prerequisite. You MUST have a callsign of a station located in a different continent in the call field of the entry window or else you cannot open the QTC windows.
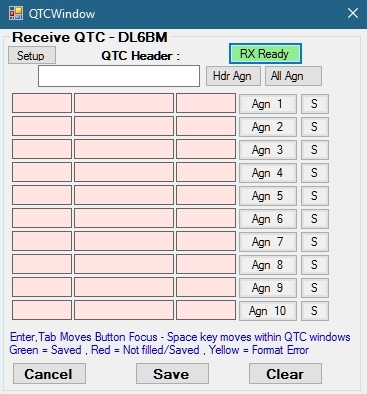
Fig. A – Receive QTC Window
The Receive QTC Window is used when you are to receive QTCs from a station outside your own continent. At the top of the window it will show “Receive QTC” and the callsign of the station you are going to receive QTCs from.
The Setup button in the upper left hand corner is used to customize the messages that will be sent when you hit any of the other buttons. This is explained in more detail in the QTC Setup Button section below.
The RX Ready button is used when the other station asks you if you are ready to receive the QTCs. Typically the other station will send something like “R U QRV”. When you are ready (QRV), press the “RX Ready” button. In this example, it is highlighted in green to show that is the button that should be pressed. In RTTY mode, once you tell the other station that you are ready, they will send the QTC Header number (also called QTC Group number) followed by the QTCs all at once. You click on the QTC Header number and the QTCs in the Digital Interface screens as they are received to populate the fields in the Receive QTC window.
The QTC Header field is used to populate the QTC Header number. A QTC Header number is actually two numbers with a slash / between them. It represents which group and how many QTCs are in the group. For example, a QTC header number of 3/10 means it is the third set of QTCs sent from that particular station and it consists of 10 QTCs. The QTC header number is usually sent first, followed by the QTCs themselves.
The Hdr Agn button is used to request a repeat of the QTC Header number.
The All Agn button is used to request a repeat of the entire QTC group consisting the header number and QTCs.
The Agn 1, Agn 2, etc. buttons are used to request a repeat of a particular QTC. Agn 1 asks for a repeat of QTC #1, Agn 2 asks for a repeat of QTC #2, etc.
The S button is a “skip” button. When you are receiving QTCs and one of the QTCs is garbled and you don’t copy it, you can click the “S” button and it will skip that QTC so you can click on the next QTC that is good. This keeps the rows in line. For example, if QTC #3 is garbled, you click the S button next to Agn 3. This will put a line in each of the fields for the third QTC in the third row. Then you can click QTC #4 when it display in the DI window and it will populate correctly in the 4th row of the QTC window. After the other station sends all the QTCs, you can then click the “Agn 3” button to request a repeat of QTC #3. When you click the “Agn 3” button, the lines disappear in the QTC fields and you are then able to click on the QTC after it is received correctly in the DI window and it will populate the third row. This will be shown in detail later.
The Cancel button is used to cancel receiving of QTCs. Sometimes QTCs cannot be received and there can be various reasons for this. There may be QRM or the other station’s signal is not strong enough to support receiving QTCs. Or the station may have technical difficulties and be unable to send QTCs. In any case, use the “Cancel” button to cancel QTCs.
Beware of some conditions of using the “Cancel” button. If you received a serial number from the other station before receiving QTCs, hitting “Cancel” will cause the QTC window to close and the QSO will be logged. If you do not have a number in the receive serial number field of the entry window, hitting Cancel will cause the QTC window to close and the entry window to be wiped clean. The QSO will not be logged.
The Save button is used when the QTC Header and all QTCs have been received correctly. Hitting the “Save” button closes the QTC window and logs the QSO & QTCs.
The Clear button clears all fields but keeps the QTC window open. Use the “Clear” button if you want to start over and have the other station send all QTCs again.
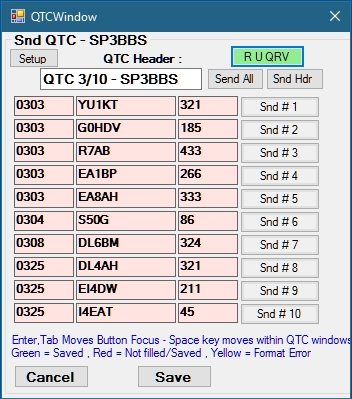
Fig. B – Send QTC Window
The Send QTC Window is used when you are sending QTCs to a station outside your own continent. At the top of the window it will show “Snd QTC” and the callsign of the station you are going to send QTCs to.
The Setup button in the upper left hand corner is the same as the “Setup” button in the Receive QTC window. It is used to customize the messages that will be sent when you hit any of the other buttons. This is explained in more detail in the QTC Setup Button section below.
The R U QRV button is used to ask the other station if they are ready to receive your QTCs. When you first bring up the Send QTC Window, the “R U QRV” button will be highlighted in Green to show that it is the next button that should be pressed.
The QTC Header field will already be populated with the header (or group) number. In Fig. B above, the QTC Header is 3/10 which means it is the 3rd group of QTCs you have sent and it consists of ten QTCs. You do not have to do anything to this field. It should remain as it is.
The Send All button is used to send all QTCs. This button is also used if the other station asks you to resend all QTCs. Pressing this button sends both the header and the QTCs.
The Snd Hdr button is used to resend the QTC Header if the other station asks for a repeat of the header.
The Snd #1, Snd #2, etc. buttons are used to resend QTCs if the other station requests a repeat (or fill) of a particular QTC.
The Cancel button cancels all QTCs, closes the QTC window and logs the QSO if there is a serial number in the receive serial number field of the entry window. If there is no receive serial number, clicking “Cancel” closes the QTC window and wipes the entry window.
The Save button is used when the other station confirms they have received all your QTCs. Clicking the “Save” button closes the QTC windows, logs the QSO & QTCs.
The QTC Setup Button on both the Receive and Send QTC windows are the same and go to the same setup screen as shown in Fig. C. Here you can customize the messages that are sent when the buttons are pressed in the QTC windows. The default messages are shown in Fig. C and they are good enough without having to change them but at least you have that option.
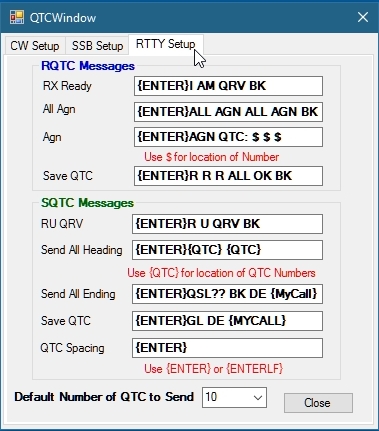
Fig. C – QTC Window message setup screen
To receive QTCs, there must be a callsign in the Entry Window. This callsign must be of a station that is in a different continent than you. When working a station outside your continent, you have the option of asking whether or not the station would like to exchange QTCs. This can be done in various ways, but one way is to ask for QTCs. You can have a special message that you can append to your report message that goes something like this:
DO YOU HAVE QTC?
When appended to the report message, it will look like this:
DL5RJA 599 17 17 DO YOU HAVE QTC?
At this point, DL5RJA will start the QTC process as shown in Fig. D. He should ask if you are QRV? (And he may or may not send the QTC header) The response to this is to press the “RX Ready” button in the Receive QTC window as shown highlighted in red in Fig. D. When you press the “RX Ready” button, this sends “I AM QRV BK”.
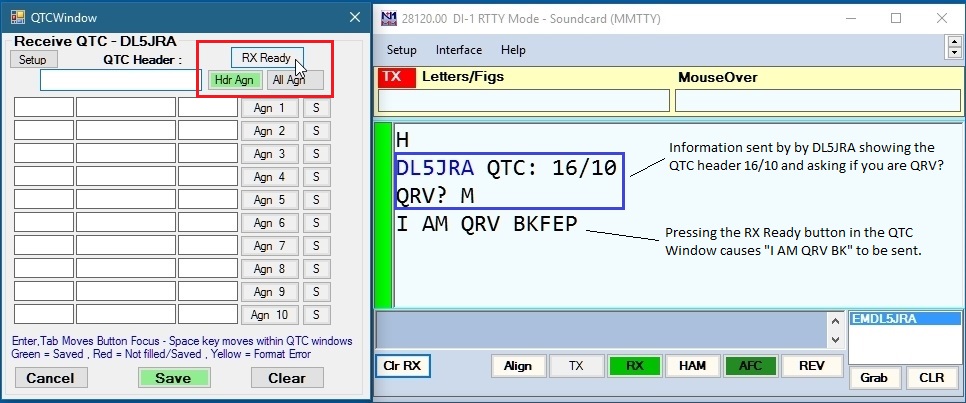
Fig. D
At this point, DL5JRA will start sending his QTCs. As the QTCs print in the DI window, click anywhere within the line and the QTC information will auto fill in the Receive QTC window as shown in Fig. E. Notice the QTC in the DI window will highlight blue temporarily when you click on it.
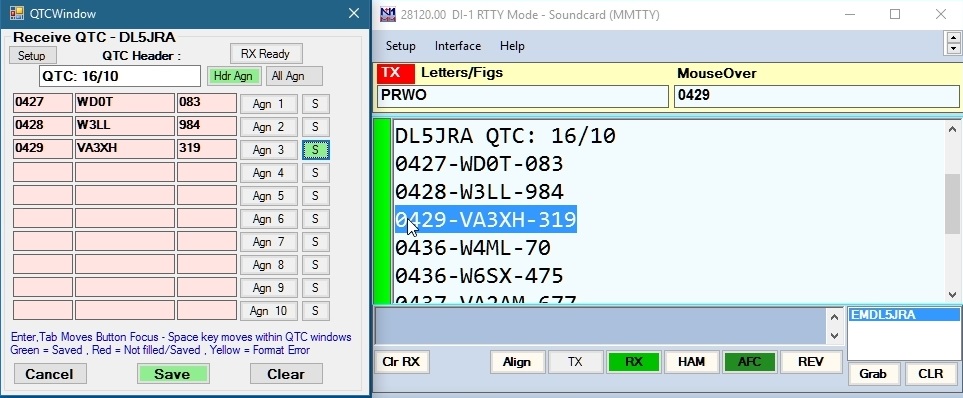
Fig. E
All is fine and QTCs are easily received when conditions are good and the signal is strong. In many instances, this is not the case, and one or more QTCs may be garbled. What happens then? If a QTC is garbled, press the “S” button in the row for that particular QTC. In the example below (Fig. F), QTC #5 was garbled so I pressed the “S” button in that row. This places a line through the QTC fields in row 5 so that you can click on #6 and it goes in the correct row. When all QTCs have been sent, you would then press the “Agn 5” button to request a fill for QTC 5 as shown in Fig. G.
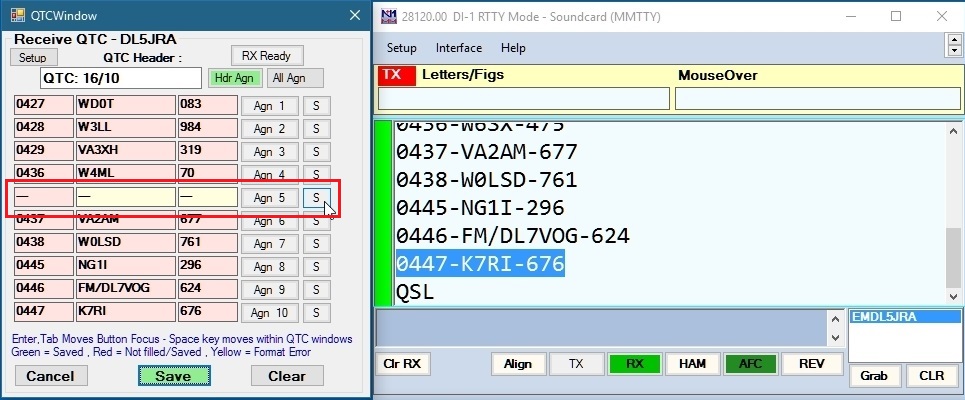
Fig. F
Fig. G shows what happens when you use the “S” button to “skip” a garbled QTC, then use the “Agn 5” button to request a repeat of QTC 5. Pressing “Agn 5” sends “AGN QTC: 5 5 5” and clears the row out so that when QTC 5 is resent, and if it’s clean, you can click on it in the DI window and it will auto fill in the correct row 5 in the Receive QTC window as shown in Figure H.
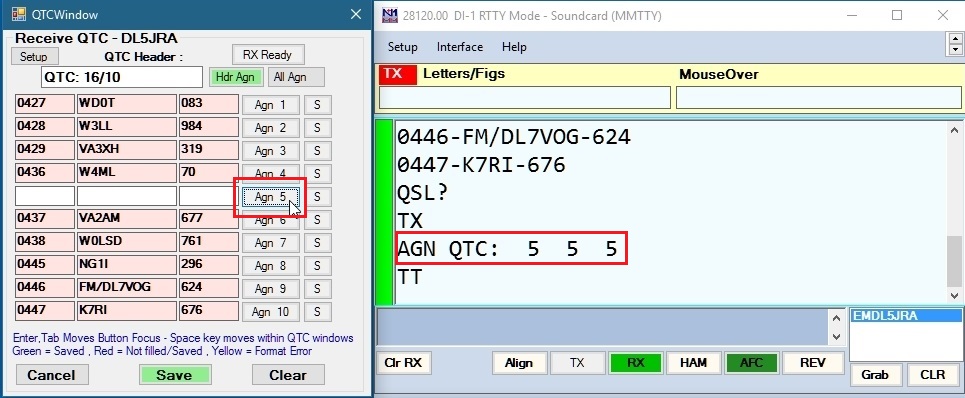
Fig. G
Clicking a resent QTC in the DI window will auto fill the empty QTC row.
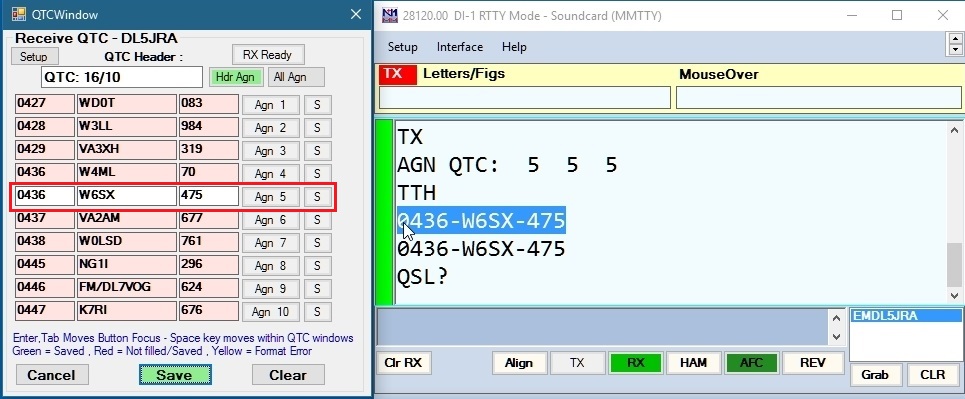
Fig. H
When all QTCs have been correctly received, you can then press the “Save” button (highlighted green above). When you click the Save button, the message “R R R ALL OK BK” is sent to tell the other station that you received all QTCs successfully and the QTC window will close automatically. Both the QSO and QTC will be logged as shown in Fig. I. This completes receiving QTCs.
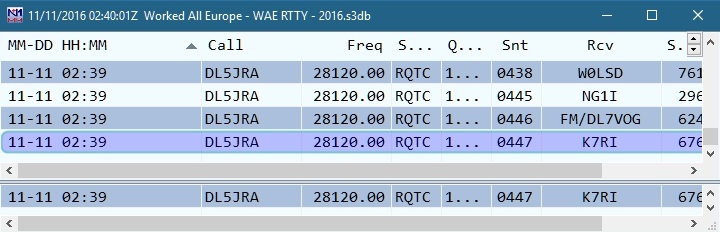
Fig. I
Sending QTCs is easier than receiving QTCs, therefore you should only send QTCs when requested to do so by the other station. Typically you would wait until you have at least 10 QSOs in your log before sending QTCs, but that is not always the case. You can send less than ten if you don’t have ten available in the log. For this example, we will assume you have at least 10 available QTCs in the log.
In most cases, one station or the other will ask for QTCs. In this example, I work DL6BM and he asks me if I have QTCs.
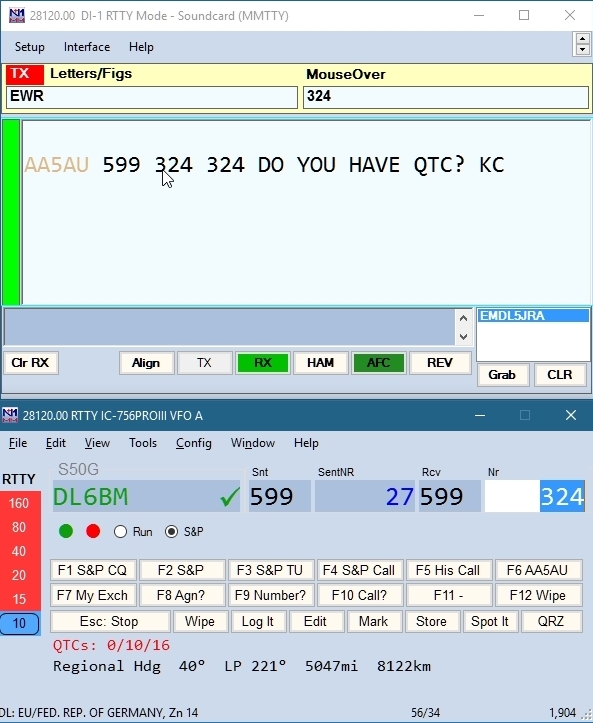
Fig. J
First click on the serial number “234” to populate the Nr field in the entry window, then type CTRL+Z. CTRL+Z brings up the QTC window. Remember, hitting CTRL+Z once brings up the Receive QTC window. So to get to the Send QTC window, hit CTRL+Z a second time. This brings up the Send QTC window as shown in Fig K. Next, press the “R U QRV” button in the Send QTC window to ask the other station if they are ready to receive your QTCs.
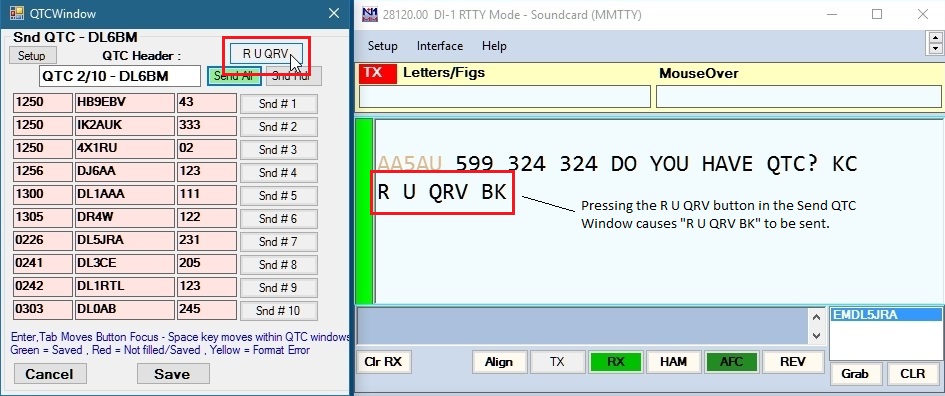
Fig. K
The other station should respond with something like “RRR I AM QRV” as shown in Fig. L. At this point, pressing the “Send All” button will cause the QTCs to start being sent as shown in Fig. M.
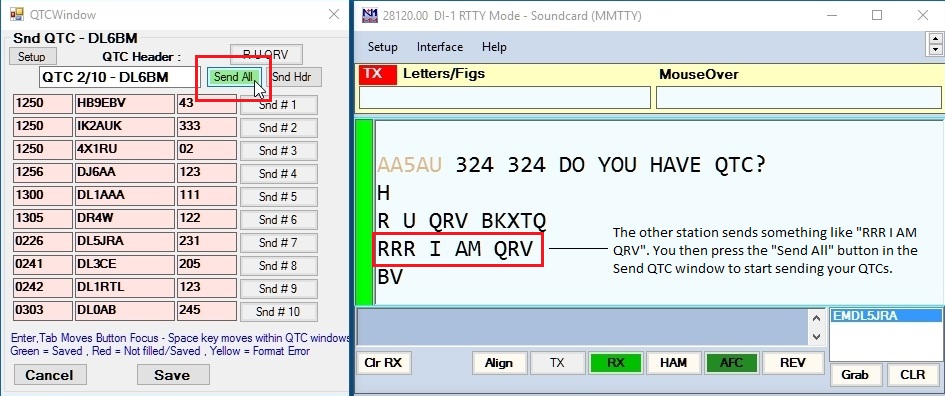
Fig. L
As you can see in Fig. M, N1MM sends the header (2/10) first, then it highlights the QTCs in green as they are sent. In this example, only the first four have been sent. Eventually all QTCs will be sent as shown in Fig. N.
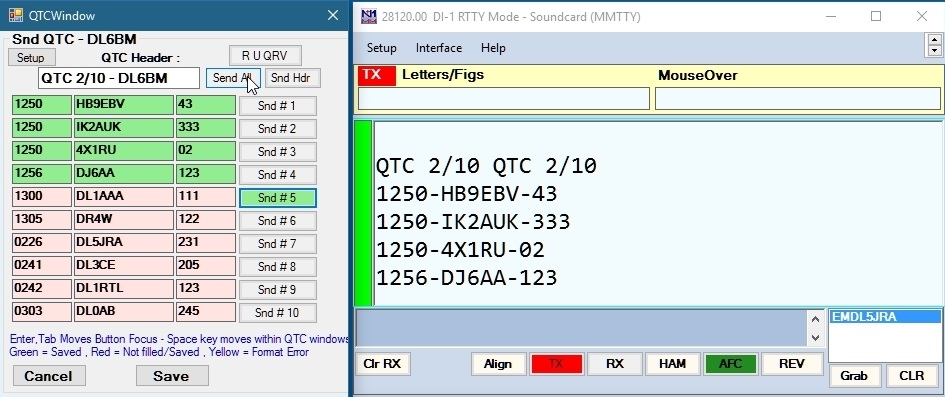
Fig. M
Fig. N shows all QTCs have been sent, but the other station needs a fill on QTC #3 and sends “PLEASE AGN NR 3 3 3”. Pressing “Snd # 3” in the Send QTC window causes QTC 3 to be sent again. Usually sending the QTC twice when asked for a fill is better than just once, especially when conditions are poor. To do this, just press the “Send #” button twice.
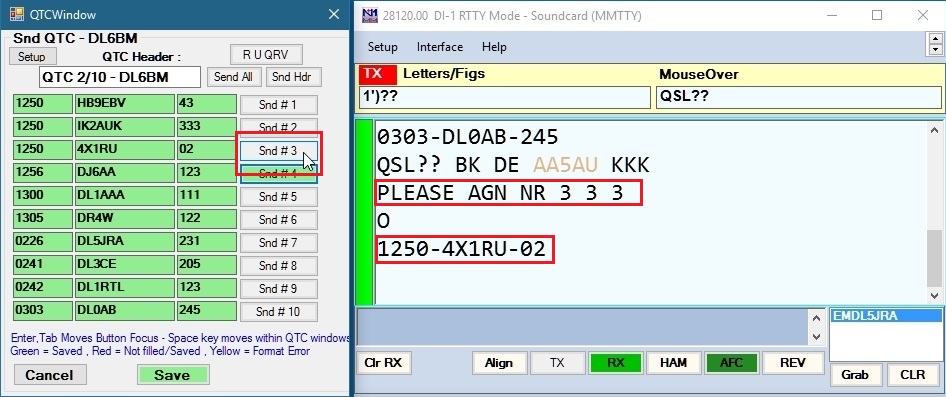
Fig. N
Once the receiving station confirms they have received all QTCs, then press the “Save” button in the Send QTC Window as shown in Fig. O.
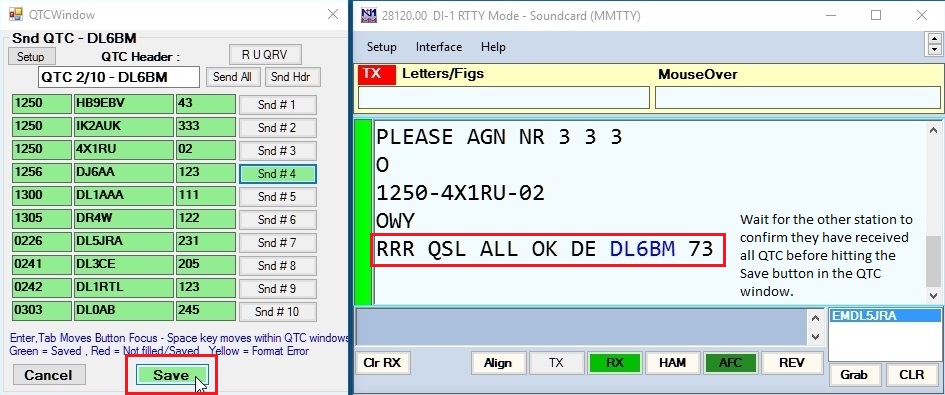
Fig. O
Pressing the Save button in the Send QTC Window causes the QTC window to close. It also logs the QSO and all QTCs sent as shown in Fig. P. This concludes sending QTCs with N1MM+.
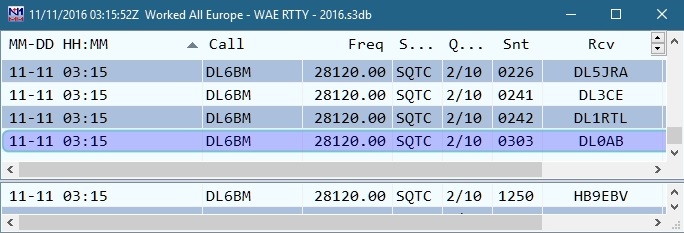
Fig. P
To determine whether or not you have exchanged QTC traffic with a particular station, N1MM uses color codes in both the bandmap and in the entry window.
This information is straight from the N1MM+ PDF help file:
The Entry Window and the Bandmap window contain visual cues about the QTC status of stations spotted in the bandmap. A special color scheme for spotted call signs has been implemented, as follows (colors are configurable – these are the defaults):
RED: the station is a new multiplier on this band (single multiplier color, the same as in other contests).
GREEN: this is a new station on this band, and you can also exchange QTCs with him (you have not yet exchanged 10 QTCs with this station) (in other contests, this is the double multiplier color, but there are no double mults in WAE).
BLUE: this is a new station on this band, but you have no more QTC’s available that can be exchanged with this station (you have already exchanged 10 QTCs, or else you are both EU stations or both DX stations, so you cannot exchange QTCs) (normal QSO color in other contests).
BLACK: this station is a dupe on this band, but you still could exchange QTCs with him for QTC points (this color is the “Color of a QTC callsign in the WAE contest” color in the Manage Skins, Colors and Fonts window).
GREY: dupe, and there are no QTC that can be exchanged – this station is non-workable for any kind of credit, so just pass him by (the same as in other contests).