
DigiRite
Using DigiRite with WriteLog in the WW Digi Contest by Don Hill, AA5AU.
The instructions on this page can also be used for the FT Roundup. In Step 3, select “ARRL RTTY Round Up” instead of “World Wide Digi Contest”. In addition you will need to change the “Exchange Sequence” in DigiRite settings to “ARRL RTTY Round Up” or similar depending on what version DigiRite you are using.
- Introduction
- Requirements
- Read Me File
- Setup WriteLog for WW Digi Contest
- DigiRite Settings
- DigiRite Transceive-1 Window
- DigiRite-1 or Main Window
- Conclusion
DigiRite is a program for sending and receiving FT4 and FT8 signals. Although DigiRite can be used as a stand-alone program, it was primarily designed to be used as an accessory to WriteLog for Windows contest logging software.
(Note: The algorithms, source code, look-and-feel of WSJT-X and related programs, and protocol specifications for the modes FSK441, FST4, FST4W, FT4, FT8, JT4, JT6M, JT9, JT44, JT65, JTMS, Q65, QRA64, ISCAT, and MSK144 are Copyright © 2001-2021 by one or more of the following authors: Joseph Taylor, K1JT; Bill Somerville, G4WJS; Steven Franke, K9AN; Nico Palermo, IV3NWV; Greg Beam, KI7MT; Michael Black, W9MDB; Edson Pereira, PY2SDR; Philip Karn, KA9Q; and other members of the WSJT Development Group.)
One distinct difference between DigiRite and other programs is that DigiRite allows you to run up to as many as five (5) transmit audio streams at the same time. Studies show that running multiple FT8/FT4 audio streams through almost any ham rig running more than 10W output will generate intermodulation distortion (IMD) products that QRM others. (How? In simple terms, the multiple streams distort each other in the rig’s output power amplifier.)
Because of this, the World Wide Digital Contest committee discourages the use of multiple audio streams in the WW-Digi Contest until after a better way to achieve multiple streams is implemented (DigiRite is experimenting with “1.1 streams” where the second signal is 1/10th the power of the first resulting in much reduced IMD, down -18 dB from IMD of 2 streams. See the DigiRite Readme file for more details.)
According to the WW-Digi Contest rules, stations causing harmful interference during the contest may be subject to disqualification. Therefore, all documentation written on this page refers to DigiRite running a single audio stream to a single radio.
In order to use DigiRite with WriteLog, you should have the latest versions of both DigiRite and WriteLog installed on your PC. The latest version of WriteLog can be found at https://writelog.com/downloads/writelog-versions.
In addition, you can build the latest version from the source by using the recipe found here.
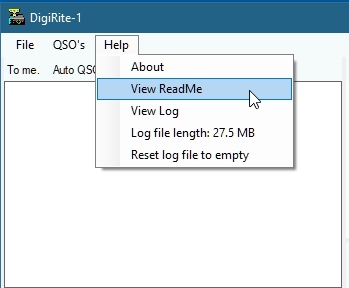
The Read Me file is the full documentation for DigiRite. It can be accessed from the DigiRite program group or from the Help menu in DigiRite. Read it in its entirety because there is information there that may not be covered here. I keep a printed copy at the operating position for reference.
Yaesu radio users, especially the FTDX-5000, FTDX-9000 or similiar, please read this page before proceeding.
Screenshot 1
Setup WriteLog for WW Digi Contest
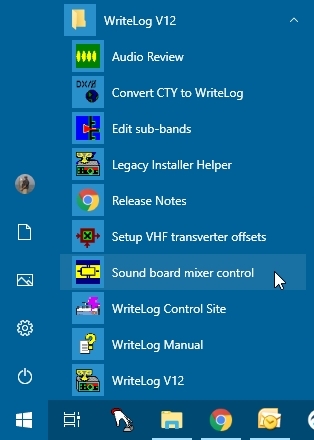
1. Before starting WriteLog, you must first confirm (and possibly set up) the sound card in the WriteLog “Sound board mixer control”. Go to the WriteLog V12 program group from the Start menu and select “Sound board mixer control”.
Screenshot 3
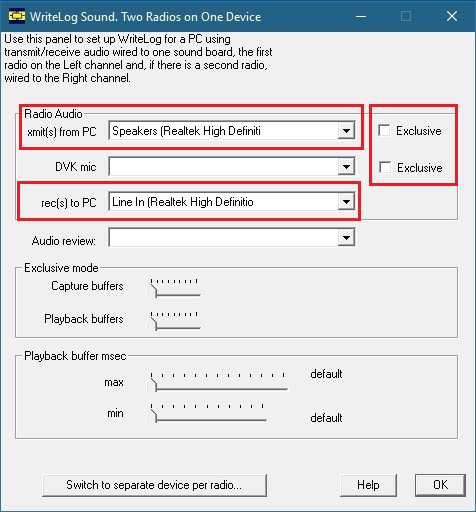
2. WriteLog Sound has two possible options. The first one is “Two Radios on One Device” (Screenshot 4) and the other is “One Device Per Radio” (Screenshot 5).
If you’re running only one radio on the PC, then either option will work even though their setup screens look different from each other. For SO2R, however, you must choose the setup according to how your two rigs are wired to your PC. See the WriteLog documentation.
Use the pull-down menus in the Radio Audio section to select the sound card for “xmit(s) from PC” (transmit audio) and “rec(s) to PC” (receive audio). Also, be sure the Exclusive check boxes are not checked. When finished, click OK to close the “Sound board mixer control”.
Screenshot 4
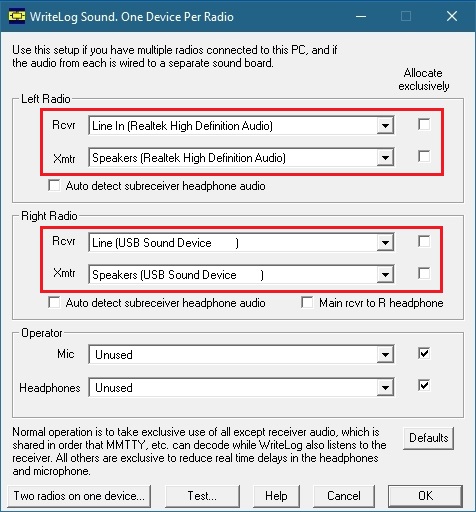
When setting up SO2R using separate sound cards for each radio, use the “One Device Per Radio” screen for setup.
Screenshot 5
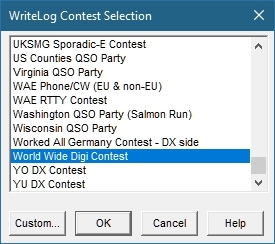
3. Open WriteLog. Choose to start a new log. When the WriteLog Contest Selection window opens, scroll to the bottom of the list and select “World Wide Digi Contest”, then click OK.
Screenshot 6
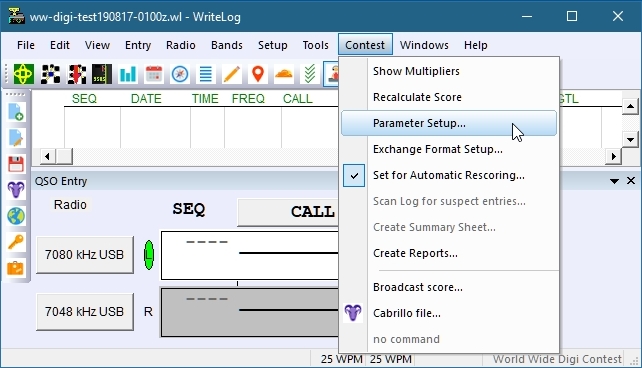
4. Next go to the WriteLog Contest menu and select Parameter Setup.
Screenshot 7
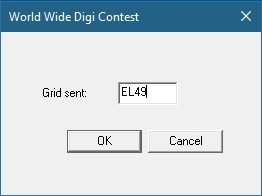
Enter your grid here. Click OK, then save your file.
Screenshot 8
5. Right-click inside the Entry Window and select “DigiRite View” to start DigiRite.

Screenshot 9
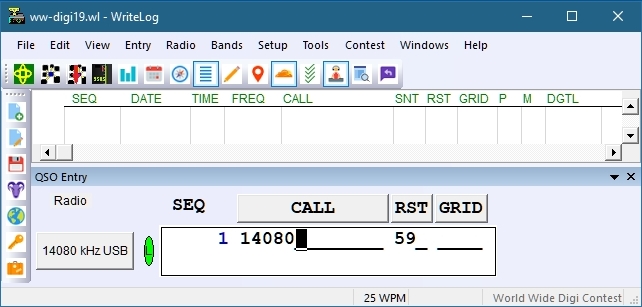
6. With your radio on and connected to WriteLog, type 14080 (or other FT4 frequency) in the entry window and hit Enter to change your radio frequency to an FT4 frequency. Place your radio in USB (upper sideband), USB-D, or other mode you normally use for FT4 and FT8. This completes the setup in WriteLog. Continue to DigiRite Settings.
Screenshot 10
The first time DigiRite opens, it opens to the Settings window. If this is not the first time DigiRite was opened, use the File menu in the DigiRite window and choose “Setup…”. This is what the “Setup” tab screen looks like (Screenshot 11a).
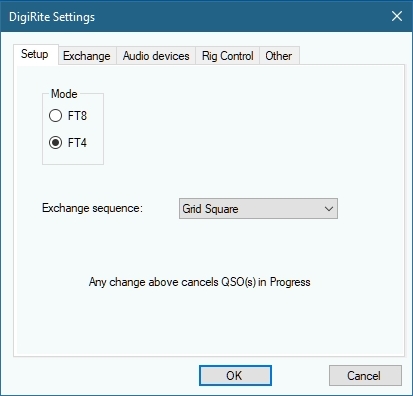
Screenshot 11a
Mode: Select FT8 or FT4 as the mode of operation. (This seems obvious but one time I spent more than a few minutes trying to figure out why I wasn’t receiving FT4 signals even though I could see signals in the waterfall. It was because I had forgotten to change the mode to FT4. Another reason for not receiving FT4 signals is the PC clock being off by more than just a second.)
Exchange sequence: Select “Grid Square” for the WW-DIGI Contest. (For everyday use or testing, select “Grid Square & dB Report”.
Next is the “Exchange” tab screen.
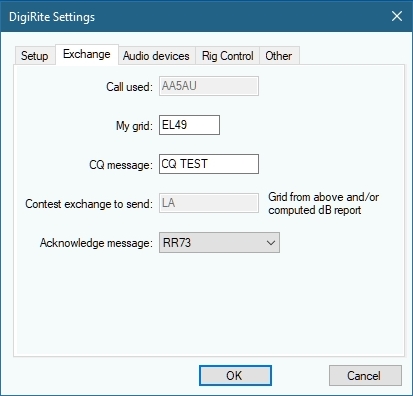
Screenshot 11b
Call Used: This should already be populated. The Call is taken from WriteLog.
My Grid: Enter your grid square here. (Grid square must also be entered in WriteLog > Contest > Parameter Setup. This was mentioned in Step 4 of WriteLog setup.)
CQ message: You can choose your own CQ message but due to the constraints of FT messaging, it may be wise to leave it simple like CQ or CQ TEST.
Contest exchange to send: This is not used in the WW-Digi Contest.
Acknowledge message: I use RR73 for the WW-DIGI contest. DigiRite does not send RR73 or 73 based on which message was received. You have to choose one or the other. RR73 works well for the WW-DIGI Contest.
Next is the “Audio devices” tab screen
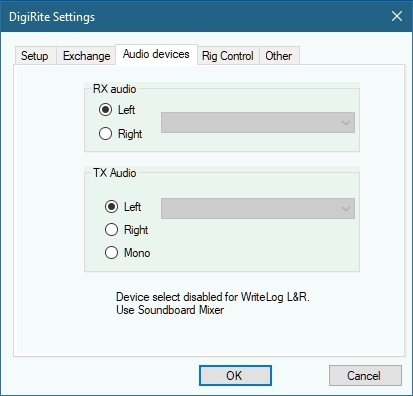
Screenshot 11c
No changes can be made here when DigiRite is used with WriteLog. The Audio devices are selected in the WriteLog Soundboard mixer control as described previous in the Setup WriteLog for WW Digi Contest section.
Next is the “Rig Control” tab screen.
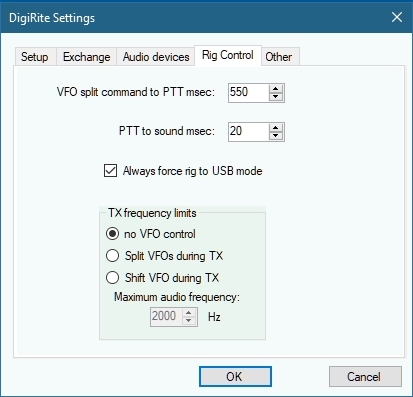
Screenshot 11d
VFO split to PTT msec: This setting is only used if “Control VFO split” is enabled. If you use “Control VFO split” and your rig has trouble switching to split when commanded by DigiRite, try increasing this value.
PTT to sound msec: This is the amount of time between when DigiRite sends PTT to WriteLog and the start of sound output (in milliseconds).
Always force rig to USB mode For rigs without a built-in dedicated digital mode, click the “Always force rig to USB mode” checkbox on and WriteLog will use the rig’s built in USB mode but log the QSOs as digital.
TX frequency limits This keeps the input audio tones high in the radio’s audio passband for transmit. See Read Me for more detailed information.
Maximum audio frequency: Determines the maximum audio frequency used when Control VFO split is enabled.
The last tab screen is “Other”.
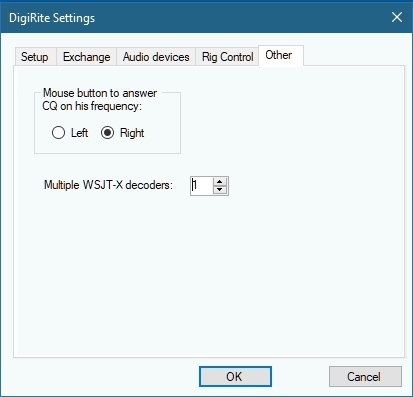
Mouse button to answer CQ on his frequency: This allows you to choose which mouse button answers a CQ station on his frequency.
Multiple WSJT-X decoders: DigiRite is based on WSJT-X code that is why it’s called WSJT-X decoders. DigiRite has the ability to use multiple decoders depending on the number of cores your CPU has. This can speed up DigiRite’s presentation of decoded messages and help eliminate late decodes. According to the Read me file, “DigiRite limits the number of decoders to the number of cores on the CPU, or 8, whichever is lower.
When you are finished with the DigiRite settings screen, click OK to close it.
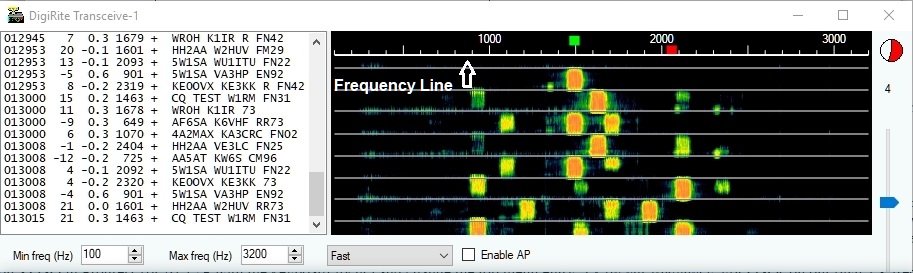
When Settings closes, there will be two windows. One is called the “DigiRite Transceive-1” window which contains the waterfall display and decodes from all received signals. Here you can set frequency limits for the display and decoding parameters (Fast, Normal, Deep). You can also enable AP if desired (only for FT8). Information on AP Decoding can be found in the WSJT-X 2.1 User Guide here.
The reason it is called DigiRite Transceive-1 is because it is for radio #1. If you were operating SO2R, there would be a DigiRite Transceive-2 window for the second radio.
Within the waterfall display, above the frequency line (refer to Screenshot 12), there is a green square indicator and a red square indicator. The green indicator shows the receive frequency of the station you are currently working (or the station you just previously worked if you are not currently in QSO). The red indicator shows your transmit frequency if you are operating split (not the same as Control VFO Split). To move the green indicator, left-click below the frequency line. To move the red indicator, left-click above the frequency line.
There is also a slide adjustment for RX audio gain and a circular clock indicator which shows red during the transmit cycle and green during the receive cycle.
Screenshot 12
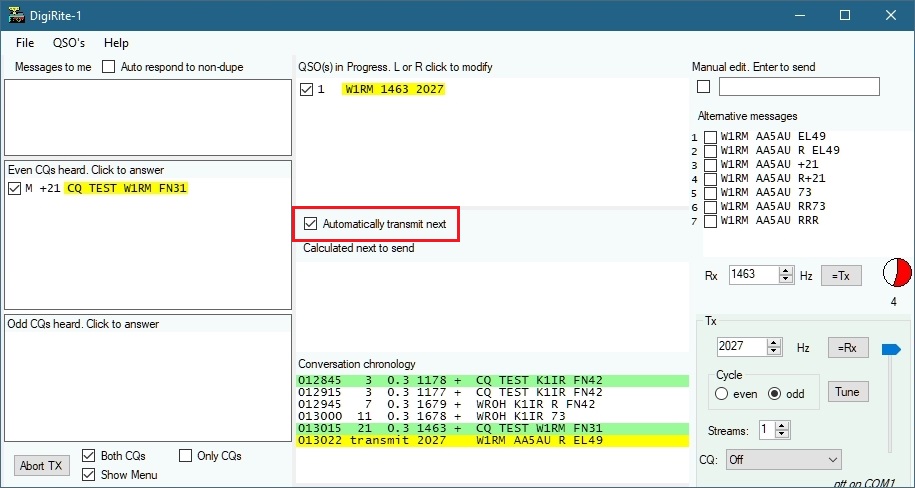
The DigiRite-1 window is also referred to as the “Main Window”. It is where you will focus most of your attention when operating. The Main Window contains several areas, referred to here as panes (such as a window pane). The panes are called “Messages to me”, “Even CQs heard”, “Odd CQs heard”, “QSO(s) in Progress”, “Calculated next to send”, “Conversation chronology”, and “Manual edit”.
Also in the Main Window are the transmit and receive frequency indicators, Odd/Even cycle radio buttons, Streams menu, CQ pull-down menu, Tune button, a cycle clock display, and a transmit audio slide adjustment.
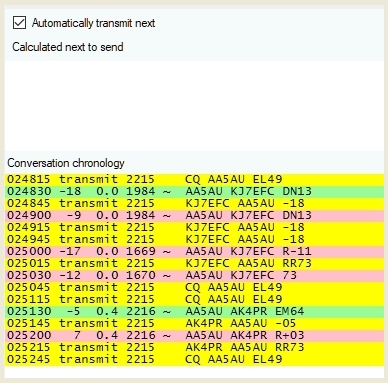
The most important part of the Main Window is the “Automatically transmit next” check box. Without this enabled, nothing gets transmitted automatically. Therefore, it’s suggested you always keep this box checked. It will be disabled each time DigiRite is started.
“Automatically transmit next” is controlled by a timeout timer. 5 minutes with no message to your call and it turns itself off. You will then have to manually re-enable “Automatically transmit next”.
Screenshot 13
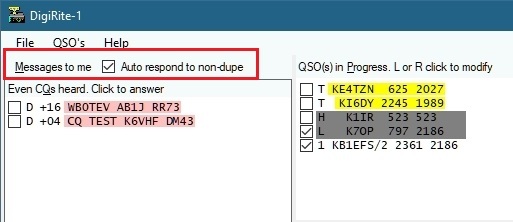
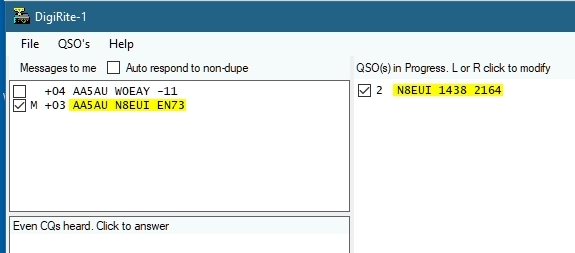
Auto respond to non-dupe & Messages to me
In the upper left-hand corner is a check box labeled “Auto respond to non-dupe” (Screenshot 14). When enabled, DigiRite automatically responds to stations calling you that are not already in your log (dupes). Typically, this will be when you call CQ but not always. Any station that calls you will get answered automatically as long as “Auto respond to non-dupe” is enabled and the station is not a dupe.
If more than one station call at the same time, the first station decoded by DigiRite will get responded to automatically. All the callers will get transferred to “QSO(s) in Progress”. So you will see them in that pane. But DigiRite will defer answering the subsequent callers to later FT8/FT4 cycles.
Although “Auto respond to non-dupe” is a fantastic feature, it may not be the best choice for contesting. Having the ability to choose between a multiplier and non-multiplier “on the fly” is more advantageous. When “Auto respond to non-dupe” is enabled, the “Messages to me” pane is not visible as in Screenshot 14.
Screenshot 14
When “Auto respond to non-dupe” is disabled, the “Messages to me” pane is visible. Messages for all stations calling you will then be displayed in that pane and you can choose which one to work first. In the example below, I chose to work the multiplier (N8EUI) instead of the non-multiplier (W0EAY). That’s the key advantage to disabling “Auto respond to non-dupe” and using “Messages to me”.
To reply to a calling station showing in the “Messages to me” pane, simply left-click or right-click the callsign (don’t click the check box). The check box is there to show which station is being replied to.
Screenshot 15
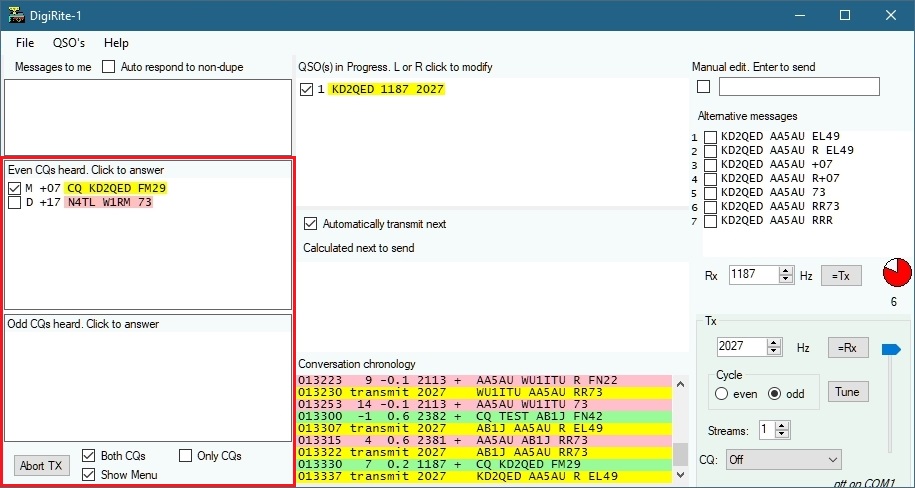
The Even and Odd CQs heard panes are where CQ messages and messages containing 73 are displayed when they are decoded. Even and Odd are the two different cycles. Messages highlighted yellow contain a new multiplier. Messages in red are dupes.
To answer CQ stations or stations having sent 73, you click on the message within one of “CQs heard” panes. (Click on the message and not the check boxes.) When a message is clicked on, the check box becomes checked to show which message was clicked.
In the example below (Screenshot 16), I answered a CQ from KD2QED by clicking his CQ message in the “Even CQs heard” pane. Left-click the message to call on his frequency (simplex). Right-click the message to call on your own transmit frequency (split). In the example, I right-clicked and called on my transmit frequency which was 2027 Hz (his TX was 1187 Hz).
Screenshot 16
Just below the CQ panes are options for “Abort TX”, “Both CQs”, “Show Menu” and “Only CQs”. “Abort TX” stops transmissions immediately. “Both CQs” will display both Even and Odd CQs heard panes. Un-check “Both CQs” and only the “Even” or “Odd” pane will show depending on which transmit cycle is selected. This is advantageous when operating SO2R and one radio is transmitting “Even” and the other radio is transmitting “Odd” and you don’t want to see CQs of the opposite cycle.
“Only CQs” will display only CQ messages and not 73 messages. If left un-checked, both CQ and 73 messages are displayed. For WW-DIGI, it may be best to use “Only CQ”. Calling stations that send 73 may not work well if you don’t copy their grid first.
“Show Menu” shows the “File”, “QSO’s” and “Help” menus at the top of the window. Un-check “Show Menu” and the menus disappear.
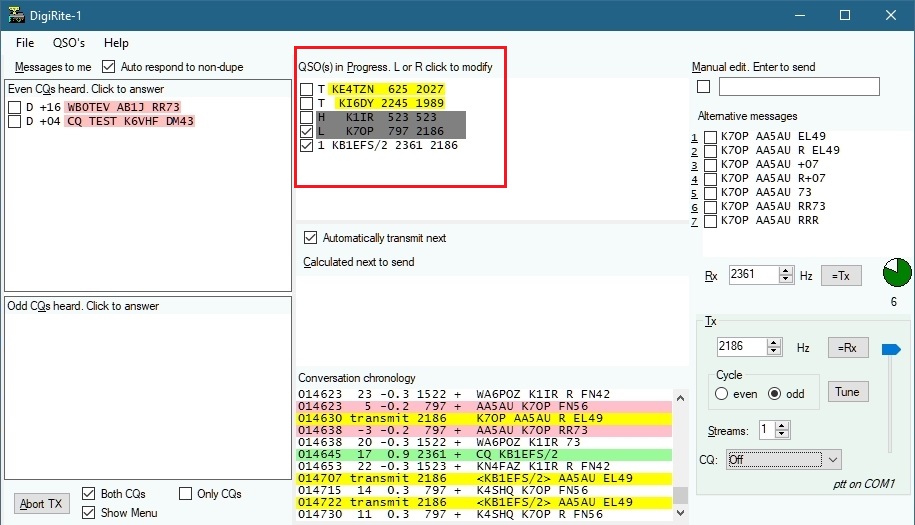
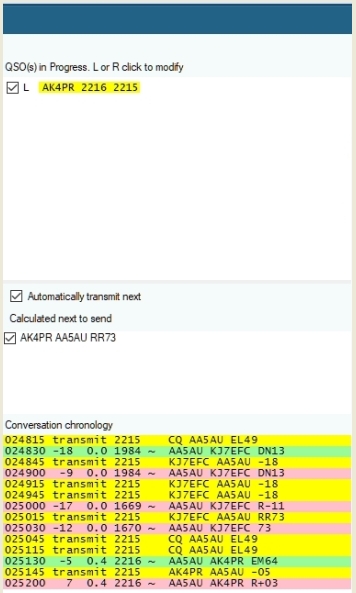
The “QSO(s) in Progress” pane shows all QSOs that have been initiated. A check mark means the QSO is active. Active means DigiRite will transmit to that station when its the highest priority one. Priority is indicated by the top-left-most in the pane.
Entries highlighted yellow are new multipliers. Entries in dark gray are those of the opposite cycle than what you are transmitting (even vs. odd).
Entries with a number represent how far along the QSO is (1, 2, 3, 4), a “T” means “timed out” (a QSO in progress goes to the “T” state after 5 cycles that it doesn’t answer), “H” means “holding” as if you called a station simplex but the station came to back someone else. After their QSO is completed, DigiRite removes the “H” and sets the QSO as active. “L” means the QSO has been logged. Stations with an “L” will automatically become inactive and therefore disappear from QSO(s) in progress after a cycle passes with no message from them.
The numbers after the callsigns in the “QSO(s) in Progress” pane represent your receive and transmit frequencies.
Screenshot 17
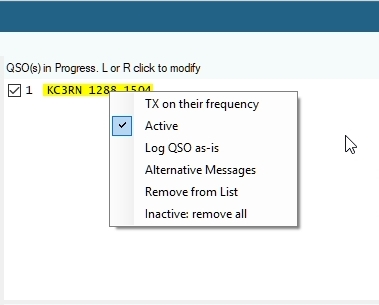
To help manage the entries in the “QSO(s) in Progress” pane, right click entries for more options.
Screenshot 18
“TX on their frequency” – when not checked, it means you are working this station split. If you want to move your TX to their frequency, click this option. Conversely, if you were transmitting on their transmit frequency but wanted to split, un-check this option.
“Active” – a check here means the QSO is active. Un-check to set the QSO to inactive.
“Log QSO as-is” – use this option if the QSO does not complete but you want this contact to be logged even though DigiRite received no acknowledgement. For WW DIGI, if the grid square has not been received, then the QSO won’t count, nor will it count if the other station does not report this QSO with you. Should you run across this same station later in the contest, WriteLog notes a missing grid square and enables DigiRite to work them again. In that case, they won’t be a dupe later.
“Alternative Messages” – click this option if you would like to display “Alternate Messages” for this station in the “Manual edit” pane.
“Remove from List” – removes the call from the “QSO(s) in Progress” listing.
“Inactive: remove all” – removes all inactive QSOs from the list. NOTE: Entries for QSOs that complete and are logged eventually disappear from the “QSO(s) in Progress” pane. However, it’s possible several entries could pile up from failed attempts to call stations that did not come back to you. Over time, you should remove these entries using “Inactive: remove all”.
“Calculated next to send” shows what the next message sent will be. It’s best explained by looking at Screenshot 19 below. I called CQ and AK4PR answered me. I sent a report and he sent a report. As his report was being received “AK4PR AA5AU RR73” appeared in the “Calculated next to send” pane to show me what message will be sent next.
Screenshot 20 shows that the message “AK4PR AA5AU RR73” was indeed sent (showing in the “Conversation chronology”) and it then is removed from the “Calculated next to send” pane.
Screenshot 19
Screenshot 20
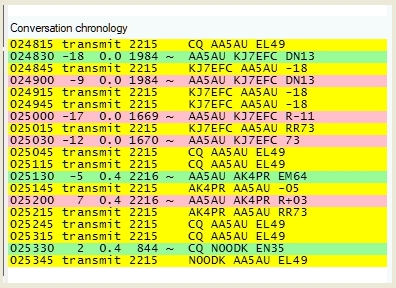
The “Conversation chronology” is exactly what it says. It’s a list of events in order that they happened as they relate to “QSO(s) in progress”. There is a scroll bar included so you can go back and look at past entries if needed.
Screenshot 21
The color codes for the “Conversation chronology” pane are as follows:
Green = Original message that started the QSO
Pink = Message to your call
Yellow = Message that you transmit
White = Message from a station that is “in progress” but doesn’t contain your call
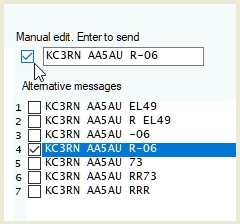
Manual Edit allows you to manually send a message. This happens rarely, especially in contesting, but it’s handy if you need it. One instance where you may need to use it is if you are in a contest that doesn’t require a signal report (such as WW-DIGI) and the station you are in QSO with keeps sending a signal report because he is waiting for a report from you. You can use “Manual edit” to send a signal report so you can finish the contact.
“Alternative messages” are provided so you don’t have to manually type in the message (although you can if you want). To use “Alternative messages”, simply click on the message you want to send and the message will populate the “Enter to send” entry box. To send, click the check box to the left of the entry box and the message will be sent on the next transmit cycle.
Screenshot 22
The “Frequency Pane” is located in the lower right-hand section of the Main Window. It’s not actually called the Frequency Pane. It’s a name I made up since this area is not already named. The “Frequency Pane” contains the Rx and Tx frequencies, buttons to match Rx to Tx or Tx to Rx, a cycle clock indicator, radio buttons for transmit cycle (even or odd), a Tune button, the Stream indicator, CQ pull-down menu and a slide control for transmit audio. It also will show an indication (ptt on COMx) if a hardware PTT connection is in use.
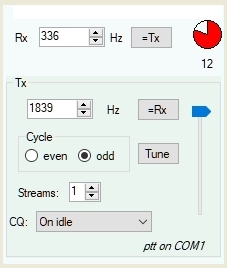
Screenshot 23
The CQ pull-down menu contains three options – “Off”, “On idle”, and “Use stream”. For the WW-DIGI contest we will use “On idle” when calling CQ. What this means is that any time you are not in QSO (i.e. idle), DigiRite will call CQ. When you complete a contact, a CQ will then automatically be sent again. If you do not receive an answer to your CQ after 5 minutes, DigiRite will turn CQ off. You will have to manually turn it back on to resume calling CQ.
The cycle clock indicator shows red during transmit cycles and green during receive cycles. It counts upward in seconds to show the how far along you are in the cycle.
The other items in the “Frequency Pane” should be self-explanatory. For more information, refer to the Read Me file.
DigiRite is an exciting new addition to WriteLog. The main disadvantage, for now, is that it’s new and therefore will take time to master.
One advantage to DigiRite is that it allows you to use your favorite logging program for FT4/FT8 contesting. However, in my testing of DigiRite, the biggest advantage I see is that DigiRite shows decoded messages slightly faster than WSJT-X. This is easy to test. Bring up WSJT-X and then bring up DigiRite as a stand-alone program. You will be able to decode FT4 or FT8 signals in both programs at the same time. Messages will appear in DigiRite slightly ahead of WSJT-X.
Although it’s only a slight difference (maybe a second or second and a half – I have no way of measuring it), it’s significant. It gives users more time to react and this could be extremely important especially when operating the super-fast FT4 mode.
It’s hard to know what this advantage will mean to one’s final score. Only experience will tell. See you in the World-Wide Digi Contest.
73, Don AA5AU