
2Tone Setup
2Tone is only supported in WriteLog versions 11.10G or later beginning March 2013. In order to run 2Tone with WriteLog, you must have the Active X control XMMT.ocx installed on your PC. For installation of XMMT.ocx, MMTTY and 2Tone, click here.
Before setting up 2Tone for the first time, read the the 2Tone Help file named 2Tone.PDF. 2Tone.PDF is located in the 2Tone folder or can be accessed via the Help menu on the 2Tone window.
Starting 2Tone within Rttyrite is a two step process. First you must select XMMT.ocx in the TU type menu, then select TNC Setup in the TU Type menu. Use the browse button in Setup XMMT.ocx to navigate to the location of 2Tone.exe, then click OK. 2Tone will then start. The 2Tone window looks like this.
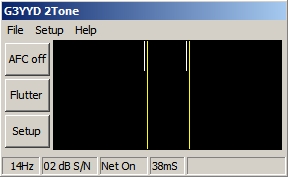
Access 2Tone Settings by either clicking the Setup button on the front panel or by choosing Settings under the Setup menu.
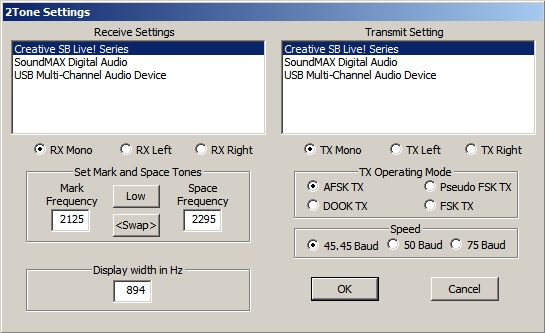
2Tone Settings
Receive Settings, Transmit Setting – At the top of the screen under Receive Settings and Transmit Setting, are a list of soundcards installed on the computer. Select the soundcard that will be used to receive RTTY. The Transmit Setting on the right is only needed if you are to use 2Tone in the main Rttyrite window to transmit AFSK. If you transmit FSK, the Transmit Setting soundcard is not used. NOTE: If you run AFSK transmit, it is highly recommended that you turn AFC off (top button on 2Tone window). The reason for this is because NET is always on in 2Tone.
Mono, Left, Right – Just below the list of soundcards, select either Mono, Left or Right depending on which channel is used in your soundcard to receive RTTY (on the left). Mono soundcards are rare these days, so it’s likely your audio is going to either the Left or Right channel. If you are unsure, try Left first. If that doesn’t work, then try Right or Mono. On the right-side of the screen, choose the channel that is used for AFSK, only if you use AFSK transmission with 2Tone.
Set Mark and Space Tones – By default, 2Tone comes set for High Tones of 2125 and 2295 Hz for Mark and Space. If you use Low Tones, then hit the Low button to change it to 1275 and 1445 Hz Mark and Space Tones. When running FSK, these settings are for receive only and must match the tone pair that is set in your radio. The Swap buttons allow you to swap Mark and Space frequency for receiving stations that are inverted.
Display width in Hz – This parameter only changes the width of the 2Tone window.
TX Operating Mode – The options here are AFSK TX, DOOK TX, Pseudo FSK TX, and FSK TX. These options are only important if you are using 2Tone in the main Rttyrite window. When 2Tone is used in a Cloned Rttyrite window, these selections have no effect.
- AFSK TX – Select AFSK if you transmit AFSK. Also, if running FSK and using WriteLog’s Software-generated or Hardware-generated FSK option, select AFSK TX. IMPORTANT NOTE: If you are transmitting AFSK and using hardware PTT (PTT via a homebrew transistor or commercial interface), you must click on AFSK in the setup window even though it is already selected. When you click on it, it should bring up a window where you can select which port you will use for hardware PTT. If you are keying PTT via radio control or using VOX, you do not need to set a COM port.
- DOOK TX – This stands for Differential On/Off Keying. This option would not normally be used when running WriteLog.
- Pseudo FSK TX – Pseudo FSK TX is a 2Tone option which outputs a 5 kHz audio tone on and off from a soundcard to duplicate Baudot transmission. This audio can then be converted to direct keyed FSK by using a homebrew circuit. This option is normally not used with WriteLog unless you have built the interface.
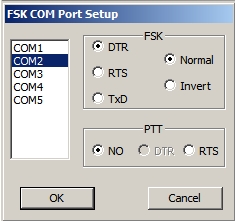
- FSK TX – This option allows 2Tone to generate FSK and is completely separate from allowing WriteLog to generate FSK. You may use either WriteLog or 2Tone to generate FSK, but not both at the same time. If you elect to use this option, you must be sure to set the COM port in Rttyrite to None. When the FSK TX option is selected in 2Tone Settings, a dialog box opens which allows you to choose hardware options for FSK and PTT.
Speed – Selects the speed of RTTY to be decoded when using FSK. Selects the speed for both receive and transmit when using AFSK. 45.45 Baud is the standard for RTTY contesting.
Other Settings
Top Button – AFC On/OFF. The top button toggles AFC (Automatic Frequency Control) on and off. AFC affects receive only, however, when using AFSK transmission, it’s better to leave AFC turned off since 2Tone has NET (the ability to have your transmit tones match your receive tones) enabled all the time. When using FSK, AFC can be turned on or off depending on the user’s preference.
Second Button – Flutter/Selective/Flat/Spread – This button optimizes the decoder to the current propagation conditions. Refer to 2Tone.pdf for more information about the parameters.
Third Button – Setup Button – Brings up the 2Tone Settings window.
File Menu – The only entries on the File menu that are available when used with WriteLog are Save Text and Exit. Save Text allows you to save receive text.
Setup Menu – Has 3 entries – Settings which brings to you 2Tone Settings (same as the Setup button), Squelch On which enables the squelch circuit, and On Top? which allows the main 2Tone window to stay on top of other windows.
Help Menu – Selects either the 2Tone.PDF help file or About which tells you which version of 2Tone you are running.