
Operating WW Digi with N1MM+
Interfacing N1MM+ with WSJT-X for the WW Digi Contest by Don Hill, AA5AU
(NOTE: this tutorial can also be used for the FT Roundup and ARRL RTTY Roundup by selecting ARRLRTTY as the “Log Type” in Step 2. The rules for the FT Roundup are basically the same as the ARRL RTTY Roundup. In WSJT-X, you will need to setup the contest mode as shown here.)
- Resources
- Requirements
- Things to Know Before You Start
- Configuring N1MM+
- Starting “WSJT-X – ForEW1” For The First Time
- Setting Up “WSJT-X – ForEW1” From Scratch
- Copy Settings from Everyday WSJT-X
- Putting “WSJT-X – ForEW1” in Contest Mode
Official instructions for using the WSJT Decode List with N1MM+ are located at https://n1mmwp.hamdocs.com/manual-windows/wsjt-x-decode-list-window/. Read that document before following the instructions here.
In addition, more information can be found in the file “N1MMWSJTInstructions.pdf” located on the Additional Support Files page at https://n1mmwp.hamdocs.com/downloads/additional-support-files/#elf_l1_Lw. (N1MMWSJTInstructions.pdf was written for an earlier version of N1MM+ but still gives valuable information.)
You should have the latest versions of N1MM+ and WSJT-X installed on your PC.
You must have a radio connected and configured in N1MM+.
You must know the path to the location of WSJT-X on your hard drive.
Some basic knowledge of N1MM+ and WSJT-X is necessary. You should be able to use both programs independently before trying to link them together.
Things to Know Before You Start
Know that when you interface N1MM+ to WSJT-X, a new instance of WSJT-X is created that is completely separate from your working “everyday” copy.
This new instance of WSJT-X is called “WSJT-X – ForEW1” and comes with all settings defaulted. To save the pain of re-configuring the new instance of WSJT-X, it’s possible to copy all the settings of your “working instance” to the new instance. Instructions on how to do that are included in the Copy Settings from Everyday WSJT-X section.
“WSJT-X – ForEW1” uses the setting “DXLab Suite Commander” to interface Radio Control from N1MM+. This is only a setting and Commander DOES NOT need to be installed on your PC. If you normally use Commander for WSJT-X, the Commander program should not be running when using “WSJT-X – ForEW1” and N1MM+ together.
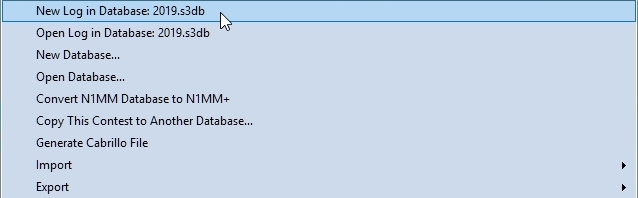
1. Start N1MM+. From the File menu, select “New Log in Database:”
Screenshot 1
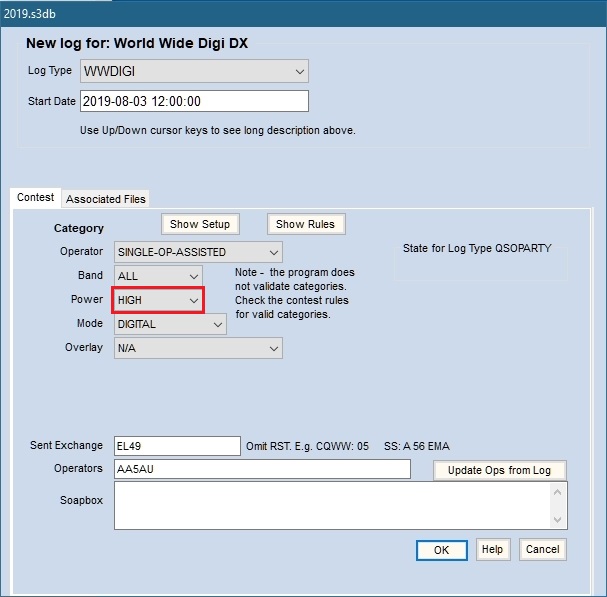
2. Select WWDIGI as the Log Type. Fill in the all the other information. You can leave the Start Date as is. Remember that N1MM+ defaults Power to HIGH. If you are entering the contest as Low Power or QRP, be sure to change it. When finished, click OK.
Screenshot 2
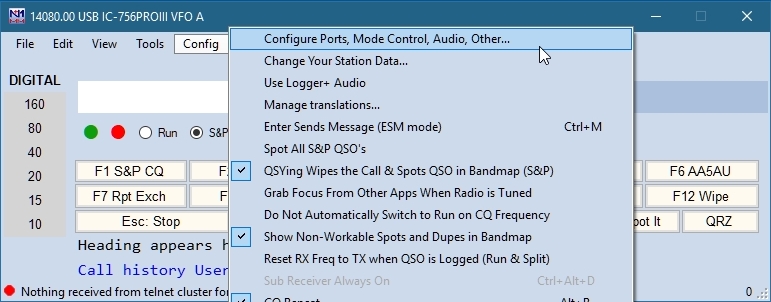
3. From the Config menu, select “Configure Ports, Mode Control, Audio, Other…” (This is also referred to as the Configurer.)
Screenshot 3
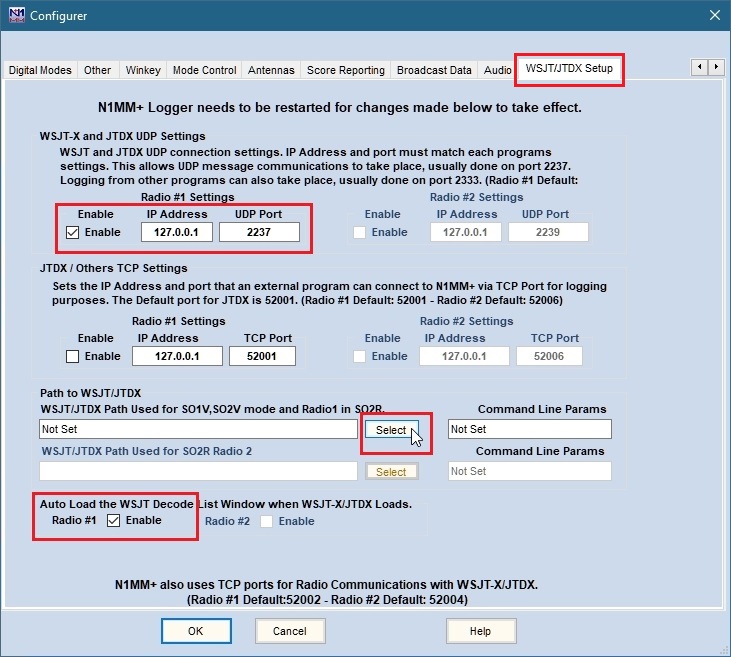
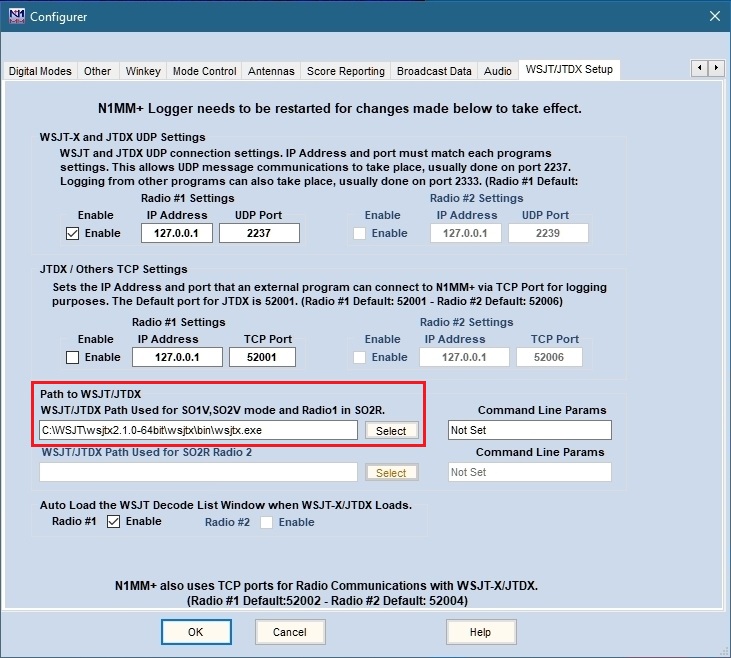
4. Go to the WSJT/JTDX Setup tab screen of Configurer and enable “Radio #1 Settings” with the IP Address 127.0.0.1 and UDP port 2237 as shown. Also enable “Auto Load the WSJT Decode List window when WSJT-X/JTDX Loads”. In the “Path to WSJT/JTDX”, click on the Select button to navigate to the location of WSJT-X (wsjtx.exe).
The default location for the WSJT-X program is C:\WSJT\wsjtx\bin\. However, since WSJT-X can be installed anywhere, you must navigate to the folder where you installed it.
Screenshot 4
When you have navigated to the correct location of wsjtx.exe, select it and click Open or simply double-click wsjtx.exe to populate the path in WSJT/JTDX Setup. (NOTE: In the example given, WSJT-X is NOT installed in the default location.)
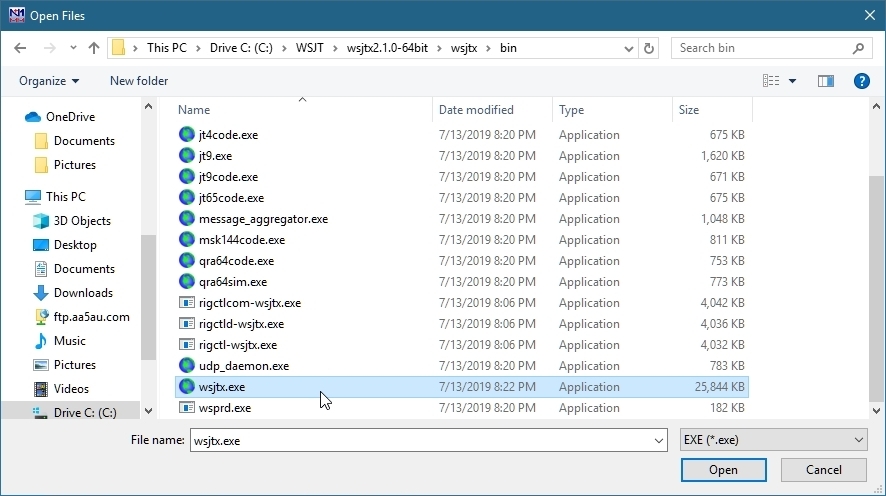
Screenshot 5
The path to wsjtx.exe is now populated. At this point, close N1MM+ and restart it for changes to take effect. Once N1MM+ is restarted, go back to the Configurer.
Screenshot 6
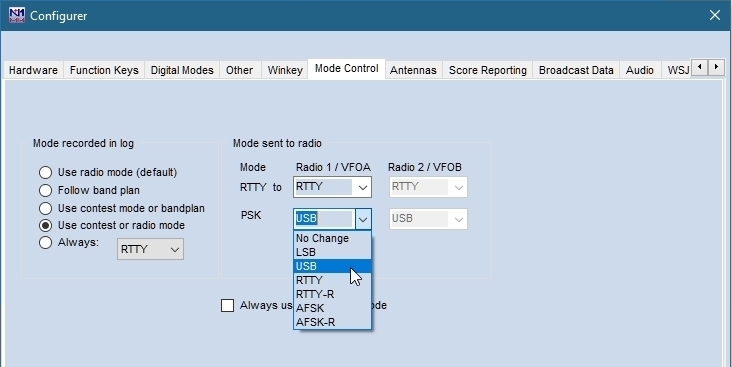
6. Go to the Mode Control tab screen of the Configurer and select what mode will be sent to the radio when using digital modes other than RTTY. In our example, the radio mode for FT4 & FT8 is USB (upper sideband). In N1MM+ the setting is labeled “PSK”. NOTE: For some radios, such as the Icom IC-7300, that use USB-D, the setting in the Mode Control screen for PSK will be “AFSK-R”. There is a chart here that shows modes for some of the popular radios and what mode the N1MM+ Logger will set the radio to when using the PSK.
Screenshot 7
If you are going to use Radio Command for PTT (this is the easiest method), then all you have to do is enable PTT via Radio Command in N1MM+. If you are going to use a COM port connected to a hardware device, such as a homebrew transistor keying circuit or a commercial interface, then you cannot set that up in N1MM+ because if you do, the “Tune” button on the front panel of “WSJT-X – ForEW1” will not work. Therefore, when using hardware PTT, it must be configured in “WSJT-X – ForEW1”. This will be done in a later step. Here are instructions for using Radio Control (CAT) for PTT.
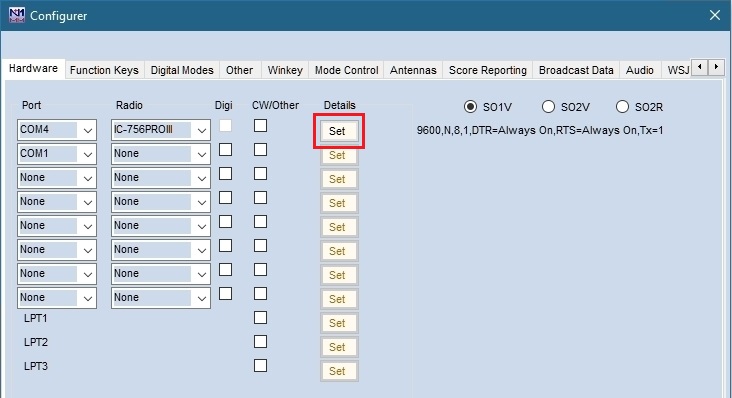
7 – Using Radio Control (CAT) for PTT – If you are using Radio Control (CAT) for PTT, you will need to check it under the COM port for your Radio. To do this, go to the Hardware tab screen of Configurer and click on Set to view the settings for your radio.
Screenshot 8
When the COM window opens, be sure “PTT via Radio Command Digital Mode” is enabled. Click OK, then OK again to close the Configurer. (NOTE: If you are going to use hardware PTT, then “PTT via Radio Command Digital Mode” should be disabled.)
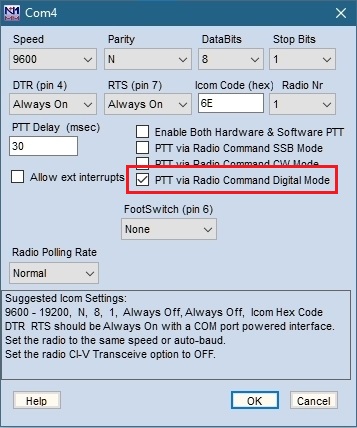
Screenshot 9
Starting WSJT-X – ForEW1 For The First Time
1. It is now time to enable WSJT-X from N1MM+ for the first time. Type either FT4 or FT8 into the N1MM+ entry window as shown below and hit Enter.
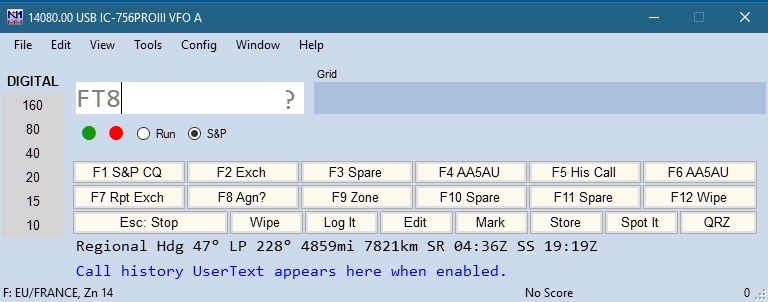
Screenshot 10
2. “WSJT-X – ForEW1” will start and it will look like the screenshot below. (If some of the N1MM windows cover up the “WSJT-X – ForEW1” window, move them away.)
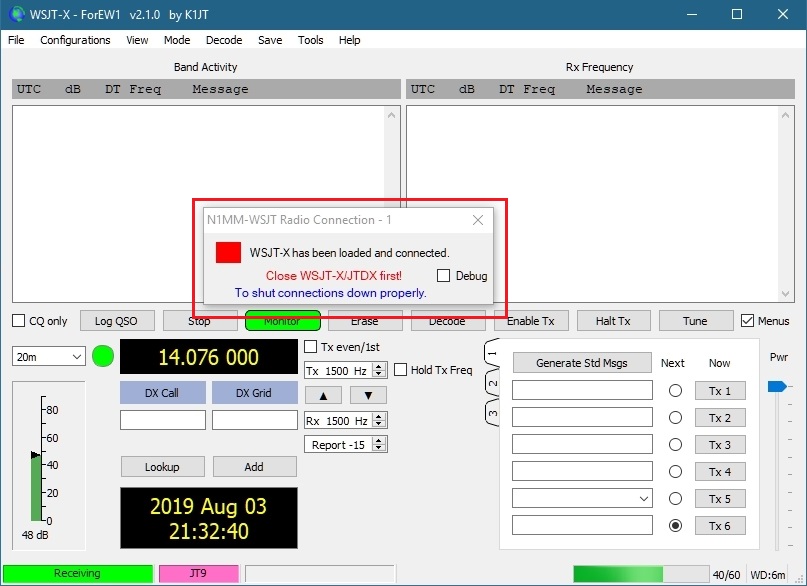
Screenshot 11
Notice the “N1MM-WSJT Radio Connection – 1” window in the middle of the screen. The red square means there is no radio connection. This is normal because all “WSJT-X – ForEW1 settings” are defaulted and there is no radio connection yet. Once a radio connection is established, the red will turn to green.
Now you have a choice to make. You can either set up this new “WSJT-X – ForEW1” from scratch with basic setting changes to get it to work or you can copy your settings from your “everyday” working copy of WSJT-X. I decided to set up the basic settings needed to allow WSJT-X to work with N1MM+ first and import my “everyday” settings later. The basic settings that are required in “WSJT-X – ForEW1” are the following:
Settings > General tab screen > Station Details (My Call and My Grid)
Settings > Reporting tab screen > UDP Server (Enable “Accept UDP requests”)
Settings > Audio tab screen > Soundcard (Input & Output)
Settings > Radio tab screen > Rig, PTT Method & Mode
If you prefer to import settings from your every day copy of WSJT-X, go to Copy Settings from Everyday WSJT-X. If you want to set up “WSJT-X – ForEW1” from Scratch, continue below.
Setting Up “WSJT-X – ForEW1” From Scratch
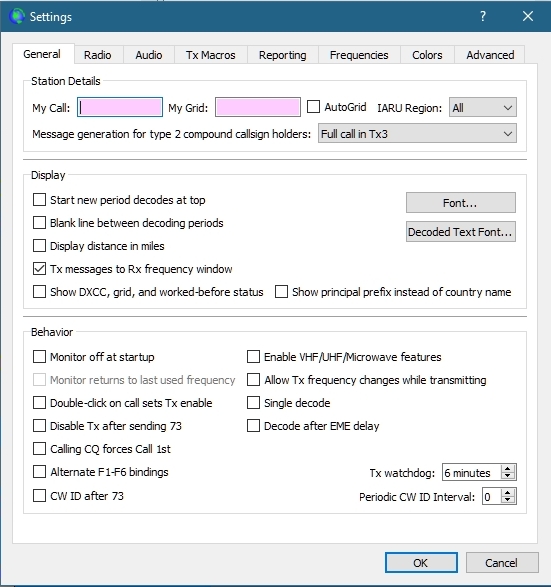
1. With “WSJT-X – ForEW1” opened from within N1MM+, go to Settings from the File menu.

Screenshot 12
2. Station Details – Go to the General tab screen of Settings. Enter your Call and Grid. Also check “Double-click on call sets Tx enable”.
Screenshot 13
3. UDP Server – Go to the Reporting tab screen, enter your callsign in the Op Call box and check “Accept UDP requests” in the UDP Server section.
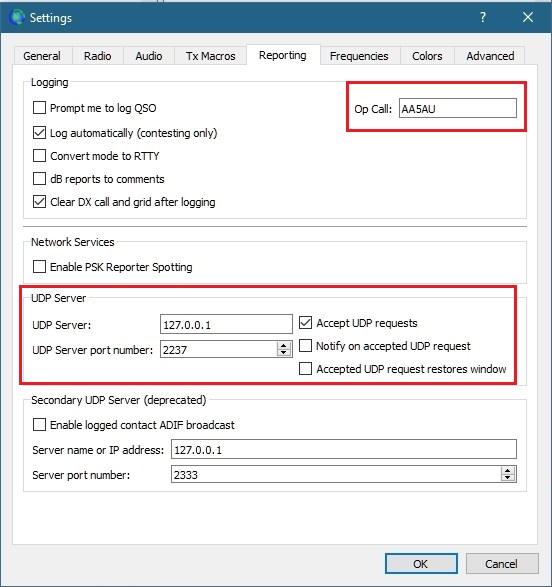
Screenshot 14
4. Soundcard – Go to the Audio tab screen. Use the pull-down menus in the Soundcard section to select Input and Output devices.
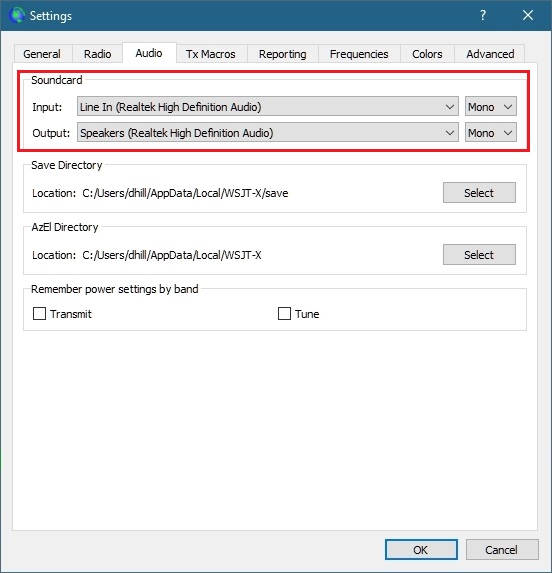
Screenshot 15
5. Rig, PTT Method & Mode – Go to the Radio tab screen. Use the Rig: pull-down menu to select “DX Lab Suite Commander”. (Remember, you are not actually using Commander and should not have Commander running – this is only a setting to allow WSJT-X to use the radio control you have set up working in N1MM+.)

Screenshot 16
6. Next, select your “PTT Method”. The “PTT Method” requires some thought. The easiest method is to use CAT (radio control), however, other options will work. For example, if you use a separate device for PTT such as a simple transistor interface on its own COM port, you can use DTR or RTS and select the Port. VOX is an option you can try but I could not get it to work. If you try VOX, be sure your radio VOX is turned on.
REMEMBER! If you use CAT as the PTT method, you must have N1MM+ configured for “PTT via Radio Command Digital Mode” (Screenshot 9). And if you use COM port DTR or RTS, then “PTT via Radio Command Digital Mode” in N1MM+ needs to be disabled.
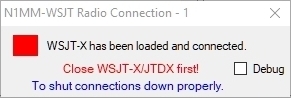
NOTE: While testing the various PTT Methods available, I found that any time a change is made, the box in the N1MM-WSJT Radio Connection window turned red. In order for changes to take effect, and to restore the radio connection, I had to restart “WSJT-X – ForEW1”.
Screenshot 17
7. Set the Mode to “None”, “USB” or “Data/Pkt”. With my radio set to USB (upper sideband), the “None” setting worked for me. If your radio needs to be in USB-D, try the “Data/Pkt” setting.
When finished with the Radio tab screen settings, click OK to close Settings. You can test the PTT function by pressing the Tune button on the “WSJT-X – ForEW1” front panel as shown below. If your radio keys when you press “Tune”, your PTT settings are working.

Screenshot 18
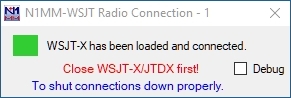
You have now configured “WSJT-X – ForEW1” with enough information to work with N1MM+. The Radio Connection should now display a green light to show the radio connection is working. If the Radio Connection is not green, try closing “WSJT-X – forEW1” and restarting before troubleshooting the radio connection.
Screenshot 19
8. Locate the Decode List on your desktop. If you have not seen the Decode List yet, it’s because “WSJT-X – ForEW1” starts on top of it and covers it up. The Decode List is a function of N1MM+ so if you click inside the N1MM+ entry window, the WSJT Decode List becomes visible. Drag the Decode List away from the “WSJT-X – ForEW1” windows so it is visible at all times.
Screenshot 20
9. Set “WSJT-X – ForEW1” to either FT8 or FT4 and either 14074 kHz (for FT8) or 14080 (for FT4) and watch “WSJT-X – ForEW1” start to decode stations. As the stations decode in WSJT-X, CQ stations will show in the Decode List (Screenshot 22).
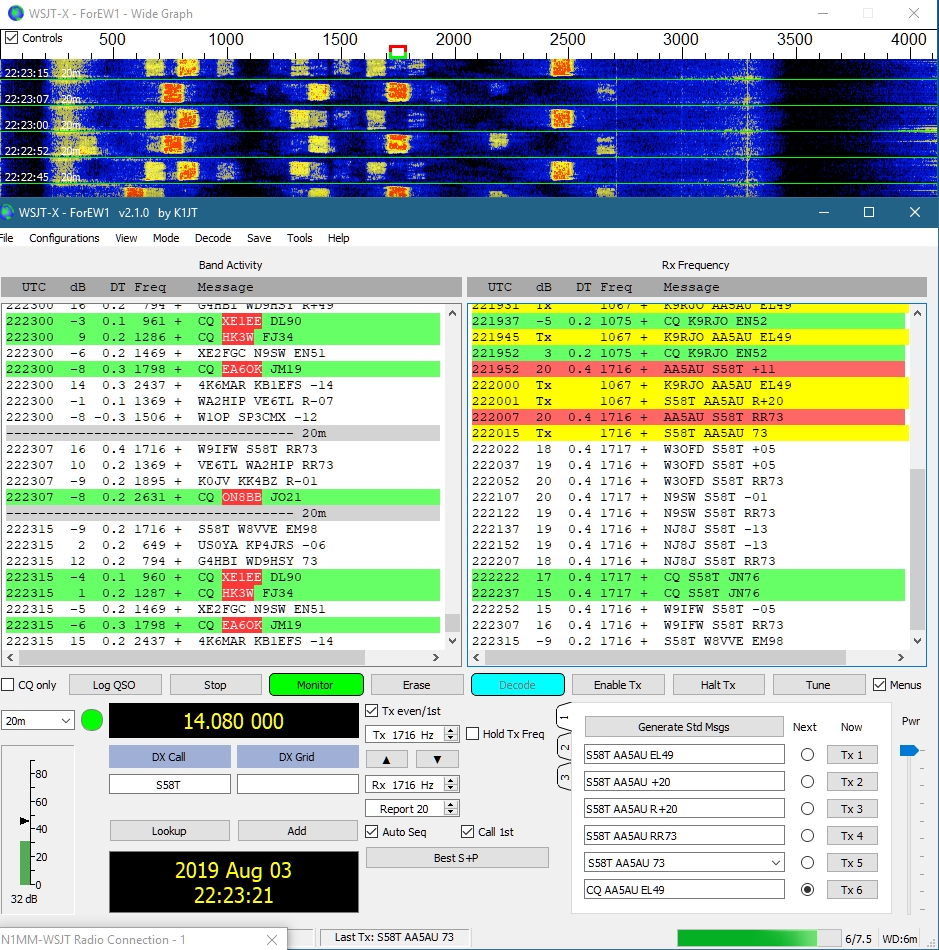
Screenshot 21
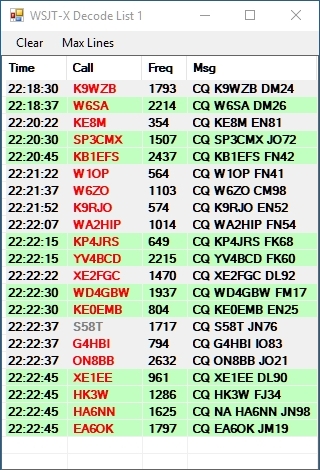
Screenshot 22
Notice I was able to work S58T. On subsequent time periods after our QSO, S58T shows in Gray since he is a dupe.
Copy Settings from Everyday WSJT-X
Copying settings from your everyday WSJT-X instance to “WSJT-X – ForEW1” is a fast and simple way to make your “WSJT-X – ForEW1” look and feel like what you are used to.
Whether you set up “WSJT-X – ForEW1” from scratch first or not, you still need to check the four basic settings after the settings are copied to make sure they are correct. Remember, the four basic settings in “WSJT-X – ForEW1” are:
Settings > General tab screen > Station Details (My Call and My Grid)
Settings > Reporting tab screen > UDP Server (Enable “Accept UDP requests”)
Settings > Audio tab screen > Soundcard (Input & Output)
Settings > Radio tab screen > Rig, PTT Method & Mode
If you set up “WSJT-X – ForEW1” from scratch first, then go in and check these settings and write them down before copying over because they could change.
Settings for WSJT-X are stored in a file named WSJT-X.ini located in a folder named C:\Users\Username\AppData\Local\WSJT (Username is the name of the User Account you are logged into on your PC). Settings for “WSJT-X – ForEW1” are in a file named WSJT-X – ForEW1.ini located in a folder named C:\Users\Username\AppData\Local\WSJT-X – ForEW1.
You are going to copy WSJT-X.ini from the WSJT-X folder to the “WSJT-X – ForEW1” folder. You will then rename WSJT-X – ForEW1.ini to something like WSJT-X – ForEW1.old and rename WSJT-X.ini to WSJT-X – ForEW1.ini.
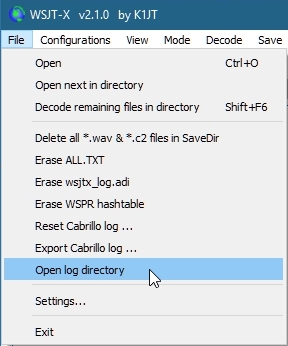
The easiest way to access WSJT-X.ini is via the “Open log directory” entry under the File menu.
Screenshot 23
1. Close “WSJT-X – ForEW1” and N1MM+ if they are open. Start your everyday instance of WSJT-X. Select the “Open log directory” option under the File menu. The File Explorer opens to the log directory for WSJT-X. WSJT-X.ini is also in that same directory.
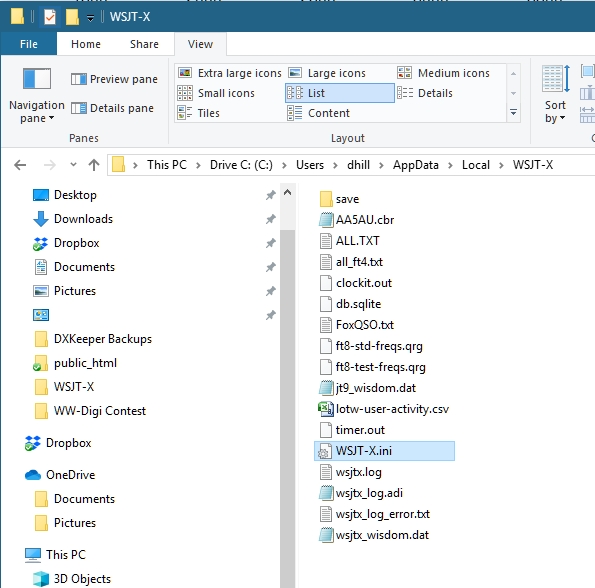
Screenshot 24
2. Right-click the file WSJT-X.ini and select Copy.
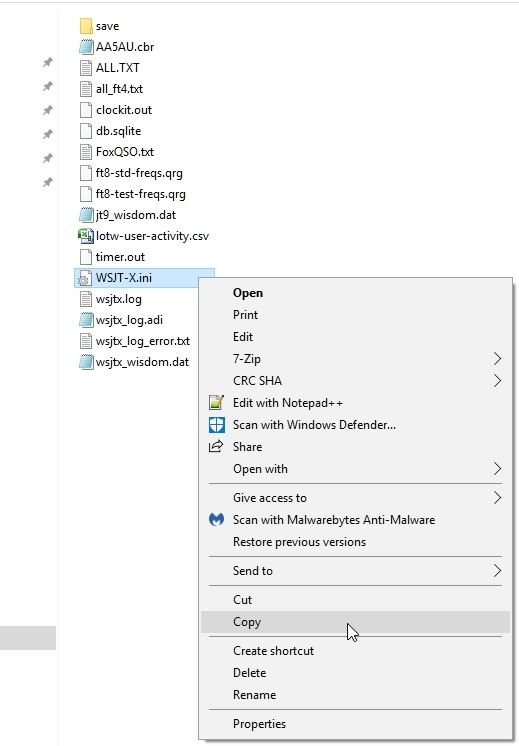
Screenshot 25
3. In the entry box that shows the path, click either “Local” or the up arrow “↑” (either will do the same thing).
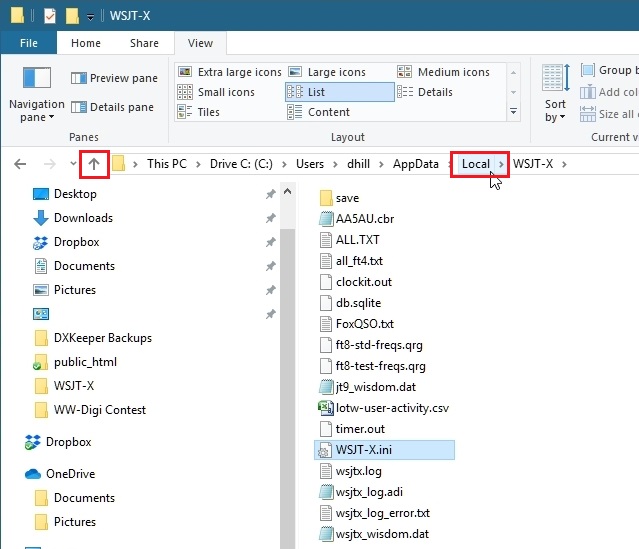
Screenshot 26
4. This brings you go the \Local folder. In our example you can see there are three folders related to WSJT-X. The WSJT-X folder is my everyday instance of WSJT-X for my Icom IC-756 PRO III. WSJT-X – Kenwood is a second instance that I use with my Kenwood radio when using two radios. The WSJT-X – ForEW1 folder is the log directory for the newly created instance of WSJT-X for N1MM Logger.
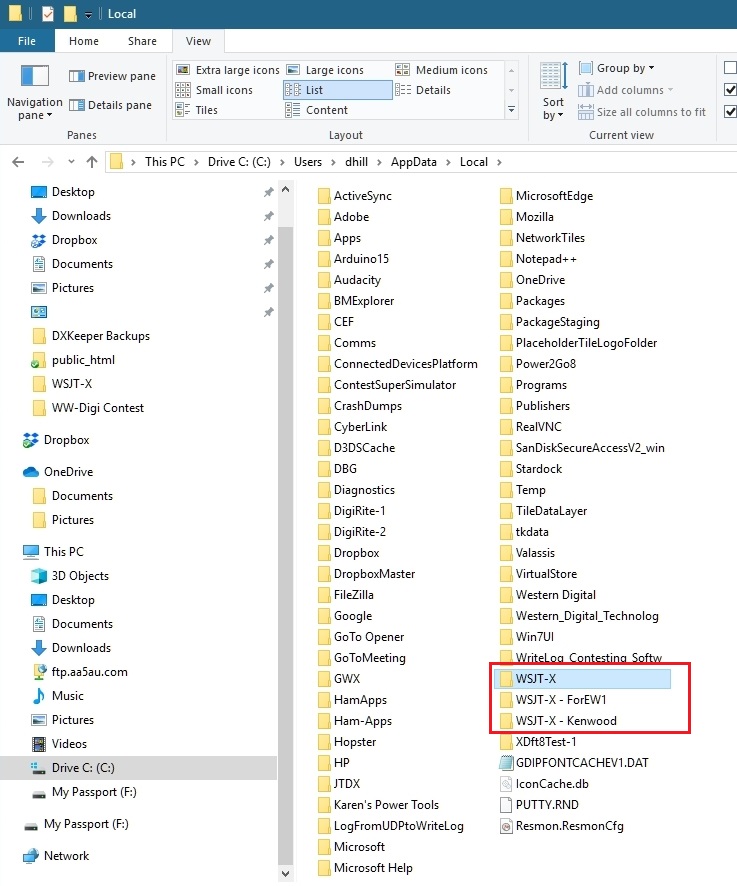
Screenshot 27
5. Double-click the WSJT-X – ForEW1 folder. When the contents of the WSJT-X – ForEW1 folder are displayed, right-click anywhere under the list of files and select Paste.
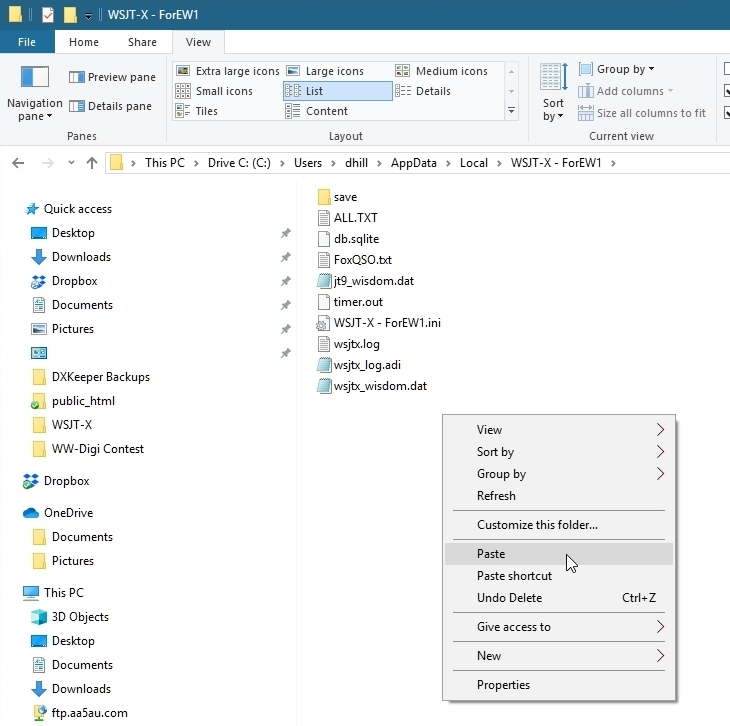
Screenshot 28
6. The file WSJT-X.ini is now in the WSJT-X – ForEW1 folder. Right-click the file WSJT-X – ForEW1.ini and select Rename.
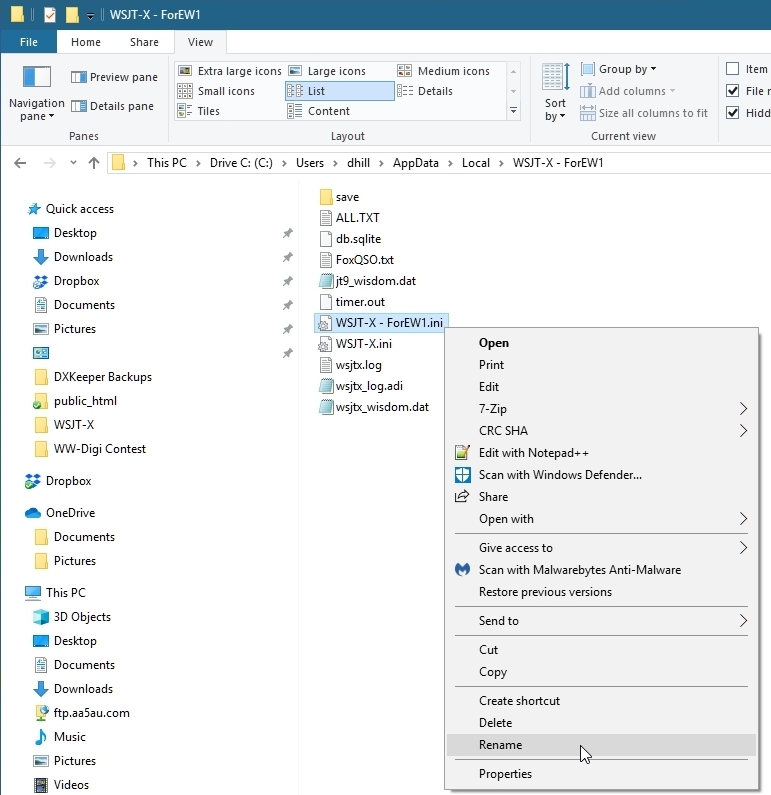
Screenshot 29
7. Rename WSJT-X – ForEW1.ini to WSJT-X – ForEW1.old. If you get an error when changing the extension .ini to .old, just click Yes.
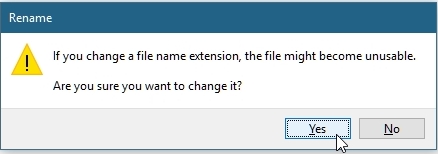
Screenshot 30
8. Then rename WSJT-X.ini to WSJT-X – ForEW1.ini and you are finished. Close File Explorer and close your everyday instance of WSJT-X. Open N1MM+ and start “WSJT-X – ForEW1” by entering either FT4 or FT8 in the N1MM+ entry window and hitting Return. Check the four settings in “WSJT-X – ForEW1” to see if they need to be changed.
Settings > General tab screen > Station Details (My Call and My Grid)
Settings > Reporting tab screen > UDP Server (Enable “Accept UDP requests”)
Settings > Audio tab screen > Soundcard (Input & Output)
Settings > Radio tab screen > Rig, PTT Method & Mode
Once all settings have been checked and “WSJT-X – ForEW1” is working, you need to put “WSJT-X – ForEW1” in Contest Mode.
Putting “WSJT-X – ForEW1” in Contest Mode
1. Open “WSJT-X – ForEW1” Settings via the File menu. Go to the Advanced tab screen. Enable “Special Operating Activity” and “WW Digi Contest” for WSJT-X v2.2.0 or later. If using v2.1.2 or earlier, select “NA VHF Contest”.
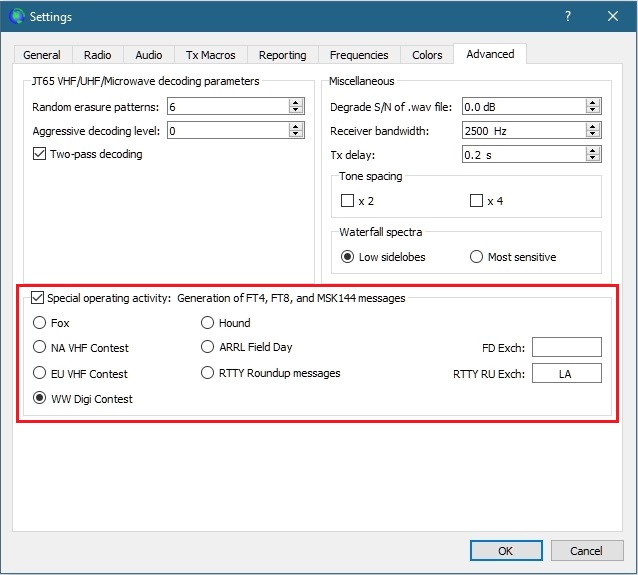
Screenshot 31
2. When you close Settings, the Contest Log for WSJT-X will open. Since you are using N1MM+ for logging you don’t need the WSJT-X log but don’t close it. Instead, minimize it. It can act like a “backup” log. Good to have your contacts in two logs.
Screenshot 32
Enjoy the contest.
73, Don AA5AU