XMMT Support for MMTTY & 2Tone
Preparing XMMT.ocx, MMTTY.EXE and 2Tone.exe for Use with WriteLog
XMMT.ocx support for MMTTY and 2Tone was added to WriteLog in March 2013 beginning with version 11.10G. XMMT.ocx is an Active X Control written by Mako Mori, JE3HHT, the creator of MMTTY. XMMT.ocx allows programs, such as WriteLog, direct access to MMTTY. In addition, XMMT.ocx allows 2Tone, created by David Wicks, G3YYD, to be used as a direct replacement to MMTTY in either the main Rttyrite window or in a cloned window. Please note that if you plan on using only 2Tone, MMTTY does not have to be installed or used. However, the best configuration for running RTTY with WriteLog is to use both MMTTY and 2Tone (one in the main Rttyrite window with one or two cloned windows).
XMMT.ocx support for MMTTY supersedes the MMTTY plug-in for WriteLog. However, both can coexist and can be run independent of each other. If users decide they want to use MMTTY with WriteLog, they can then decide which method to use for MMTTY. However, XMMT.ocx must be used for 2Tone.
The key component to using MMTTY and 2Tone with WriteLog is XMMT.ocx. The only requirements are that XMMT.ocx resides on your PC and is registered by Windows. If you happen to have a recent version of DXLab WinWarbler, Logger32, or N1MM Logger installed on your PC, then XMMT.ocx may already be on your computer and registered. To check for XMMT.ocx, search your PC for XMMT.ocx. If you find XMMT.ocx, write down its location in case it is needed later in the process (it may reside in more than one location). If you find XMMT.ocx, it is likely already registered with Windows by one of the previously mentioned programs, but this is not guaranteed. Do not move or copy XMMT.ocx. If it has been registered in Windows, then it needs to stay where it was registered. You will know if it is registered the first time you select XMMT.ocx under the TU type menu in Rttyrite. If it’s not registered, WriteLog will attempt to register it for you. If you find XMMT.ocx on your PC, you may skip Steps 1-3 below and start with Step 4. If you do not find XMMT.ocx on your PC, start the process at Step 1.
The instructions on this page include:
Downloading XMMT.ocx
Downloading and Running MMTTY.EXE
Downloading 2Tone.exe
Setting up XMMT.ocx in WriteLog
Running MMTTY from XMMT.ocx
Running 2Tone from XMMT.ocx
1. If XMMT.ocx exists on your computer, skip Steps 1-3 and continue on to Step 4. If XMMT.ocx does not exist on your PC, start here. Think of a location where you will place the file XMMT.ocx on your hard drive. It is suggested you place it in C:\MMTTY. If you do not already have a folder at C:\MMTTY, create one. Make sure this folder has full read/write privileges. If you decide to place XMMT.ocx in a location other than C:\MMTTY, it is strongly suggested the path does not include a space character in any folder name and you write down its location. You will need to navigate to this location later in the process.
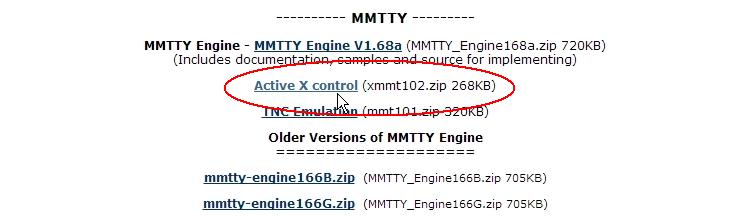
2. Go to http://hamsoft.ca/pages/programmers/programmer-downloads.php and download the zipped file xmmt102.zip into C:\MMTTY or some other known location on your hard drive. (If you are using Google Chrome as your browser, it may download into C:\My Documents\Downloads by default – this is OK.) The file XMMT.ocx is located in this zipped file. This is what it looks like on the webpage.
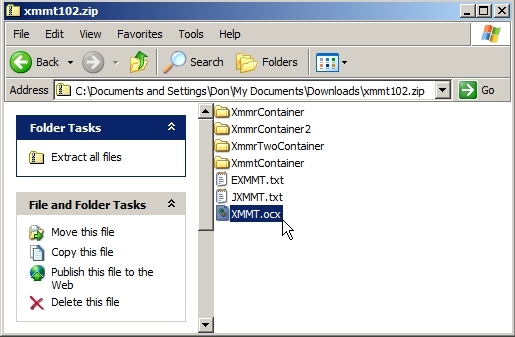
3. Open the zipped file xmmt102.zip. The only file you need inside this zipped file is XMMT.ocx. You may discard or ignore any of the other files. Extract or copy XMMT.ocx into C:\MMTTY or some other known location on your hard drive that you selected in Step 1. XMMT.ocx is now ready to be used with WriteLog. It will be registered later in the process.
Downloading and Running MMTTY.EXE
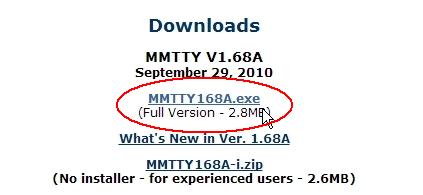
4. If you have MMTTY on your computer, skip this step and continue to Downloading 2Tone.exe. If you do not have MMTTY installed on your computer, it is recommended you install the full stand-alone MMTTY program. Go to http://hamsoft.ca/pages/mmtty.php and download the full version MMTTY168A.EXE. MMTTY168A.EXE is the installation file for the full version of MMTTY. After downloading MMTTY168A.EXE, close all other applications and run MMTTY168A.EXE. IT IS STRONGLY RECOMMENDED THAT YOU INSTALL MMTTY IN C:/Ham/MMTTY or C:/MMTTY AND NOT C:/PROGRAM FILES/MMTTY. (For additional information on downloading, installing and using MMTTY, see Getting Started on RTTY.)
NOTE: Having the full MMTTY stand-alone program on your PC will allow you run MMTTY outside of WriteLog. This can be helpful in particular when troubleshooting any possible problems with your setup. If a problem exists when running MMTTY stand-alone, then the problem is not a WriteLog problem and vice versa. Having the stand-alone MMTTY program also gives you access to the MMTTY Help file.
NOTE: If you have 2Tone (2Tone.exe) on your computer, you may skip this step although it may be beneficial to read it anyway. 2Tone may be downloaded from the 2Tone Page on rttycontesting.com (thanks to David, G3YYD, for allowing me to host versions of 2Tone). Please note there are several versions of 2Tone. To start, try downloading the latest version first to get started. Later, when you become more comfortable with 2Tone, you can try other versions if you like.
5. Create a new folder on your hard drive at C:\2Tone.
6. Go to the 2Tone Page on rttycontesting.com. Download the latest version of 2Tone into the folder C:\2Tone.
7. Unzip the contents of the 2Tone zipped file downloaded in Step 6 into C:\2Tone. 2Tone is now ready to be used with WriteLog. (NOTE: It may be helpful to read the release notes and help file for 2Tone that are included in the zip file and can be found in C:\2Tone. However, some of the information is not directly related to use with WriteLog.)
Setting up XMMT.ocx in WriteLog
8. Open WriteLog and select a RTTY contest such as ARRL RTTY Roundup or CQWW RTTY. (NOTE: You must be running WriteLog version 11.11C or later.) If a Rttyrite window did not open, go to the Window menu and select RTTY Window. If this is the first time you have opened a RTTY Window, you may need to resize it to make is smaller and move it so it doesn’t overlap the main WriteLog window.
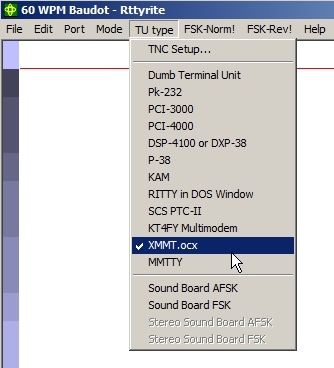
9. The RTTY Window is called Rttyrite. It will be referred to as the main Rttyrite window. In the Rttyrite window, go to the TU Type menu and select the XMMT.ocx option. (IMPORTANT NOTE: The MMTTY entry just below XMMT.ocx may or may not exist in the TU Type menu. The MMTTY entry is for the MMTTY plug-in for WriteLog. XMMT.ocx support for MMTTY supersedes the MMTTY plug-in for WriteLog and is the modern and recommended way to run MMTTY because it supports other decoders such as 2Tone. The MMTTY plug-in can be uninstalled but doesn’t necessarily need to be. It can coexist with XMMT.ocx support for MMTTY. If you decide to use XMMT.ocx and will no longer use the MMTTY plug-in, it can be uninstalled from Add/Remove Programs in the Windows Control Panel. See Uninstalling the MMTTY plug-in for WriteLog for more information.)
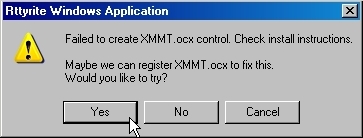
10. If you did not originally have XMMT.ocx registered on your PC, a window will appear asking to try to register XMMT.ocx. Click Yes. (NOTE: If you do not get this window then XMMT.ocx must already be registered on your PC. If you did not get the window shown below, continue to Step 13.)
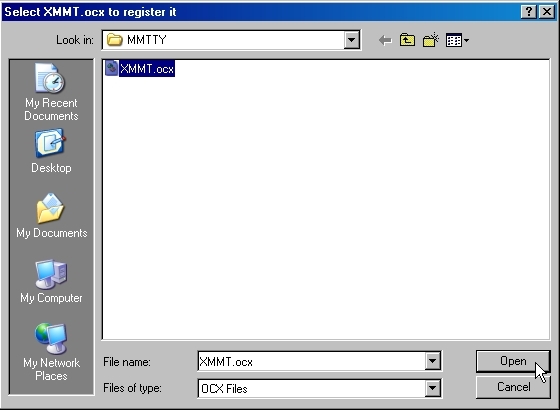
11. Browse to the location of XMMT.ocx on your hard drive. Select it and click Open.
12. A screen will display that you have registered XMMT.ocx successfully. Click OK. XMMT.ocx is now registered on your PC. Once XMMT.ocx is registered, you will not have to do anything else with it.

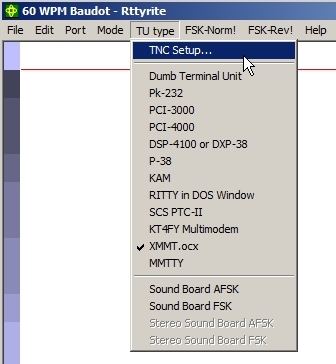
13. Running MMTTY from XMMT.ocx is a two step process. First you must select XMMT.ocx from the Rttyrite TU type menu. Nothing will happen. Then you must go back to TU Type menu and select TNC Setup.
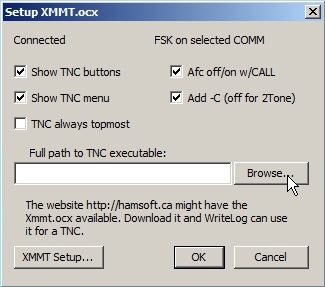
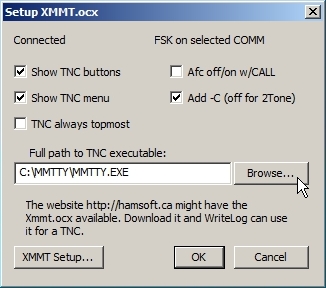
14. When the Setup XMMT.ocx screen appears, it should look something like this. To enable MMTTY, click on Browse button.
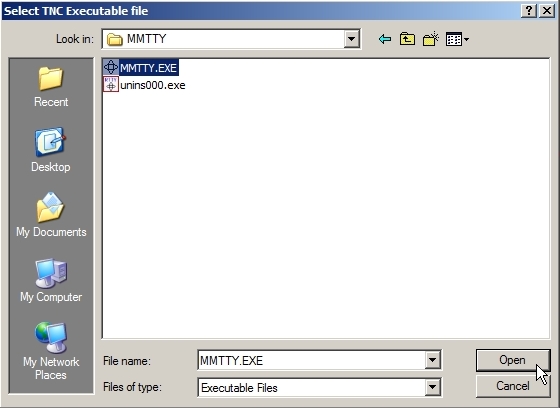
15. Navigate to C:\MMTTY or wherever you installed MMTTY. Click on MMTTY.EXE, then click Open.
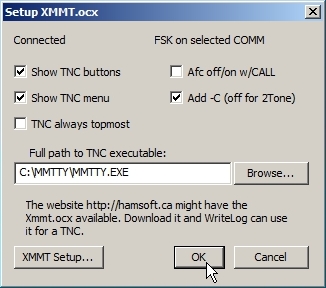
16. The path to MMTTY.EXE will now be populated in the path field of Setup XMMT.ocx. If you want to Show TNC buttons and Show TNC menu(recommended), make sure they are checked. If you want the MMTTY control panel to always be on top of other windows, check that box. Otherwise, you can leave it not checked. The Add -C (off for 2Tone) check box is there for technical reasons. Testing has found that MMTTY should work with or without this box being checked. If you leave it unchecked and MMTTY does not open, try checking this box. When finished, click OK. (Note: The Afc off/on w/CALL option is only used with MMTTY and not 2Tone. It allows AFC to be automatically turned off when a callsign populates the call field and turned on when the entry window is cleared either by logging a contact or manually cleared. If disabled, AFC is turned off and on manually using the AFC button on the RTTY control panel for MMTTY.)
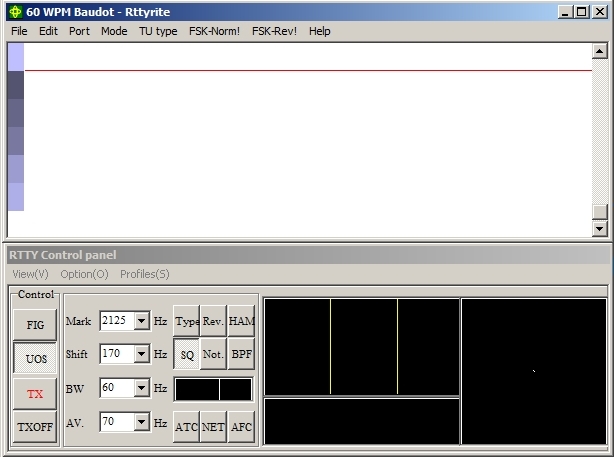
17. The MMTTY control panel should now open. Resize and move your windows around so they do not overlap each other. MMTTY is now up and running with WriteLog. If you have used MMTTY before, then it may already be set up and ready to go. If you have not used MMTTY before, go to the MMTTY Setup page to see how to set up the parameters for MMTTY in MMTTY Setup.
18. First select XMMT.ocx from the TU type menu in the main Rttyrite window. Nothing will happen. Go back to the TU Type menu and selectTNC Setup.
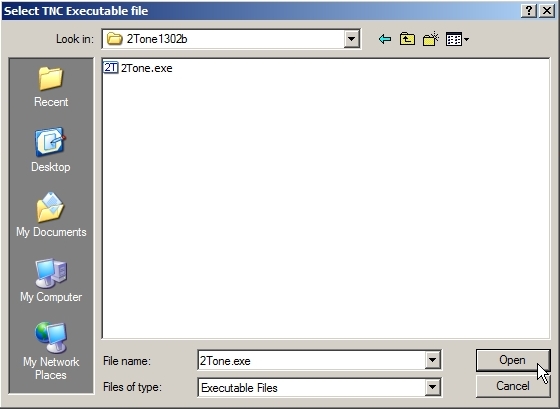
19. When Setup XMMT.ocx opens, click the Browse button (disregard anything that may already be in the path field).
20. Navigate to a location of 2Tone.exe. Click on 2Tone.exe and click Open.
21. In Setup XMMT.ocx, the path has been filled to the location of 2Tone.exe. Make sure the Add -C (off for 2Tone) is not checked. The Show TNC buttons, Show TNC menu, TNC always topmost and Afc off/on w/CALL check boxes on the left have no impact on 2Tone and can be ignored. Click OK.

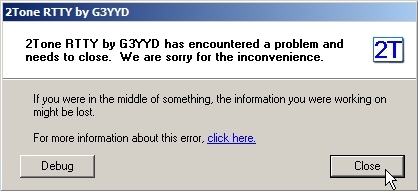
Note: If you receive the error screen below, it means you forgot to uncheck Add -C (off for 2Tone). Click Close, then go back to the Rttyritewindow and select TNC Setup and disable Add -C (off for 2Tone).
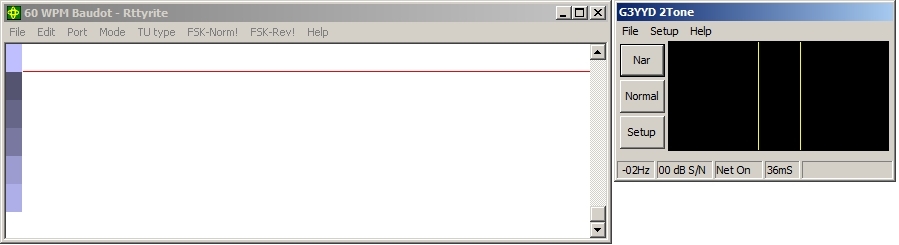
22. The 2Tone tuning display window should now appear. Move it so it does not overlap any other windows. 2Tone is now active in WriteLog. If you have used 2Tone before with another program, it may be all set up and ready to go. Otherwise, refer to the 2Tone Setup page.