
WriteLog RTTY Starter Page 16
There are other windows that may help to have showing on the screen during a contest. For every window that is added to the screen, the screen will need to be re-arranged. Eventually a “standard” screen setup will be established that the user will be comfortable with. Even after years of using WriteLog I find myself constantly re-arranging the screen trying to make things more efficient. Over the years I’ve found that there are certain windows I want on the screen and some I don’t. The basic screen layout for AA5AU besides the main WriteLog window, shows the Rttyrite window, Band Map, MMTTY RTTY Control Panel, the Super Check Partial, the Check Call window, the Band Summary window and the Beam Headings window. For contests where the Packetcluster is used, I also include the Packet window and Packet Spots window. However, in those contests where packet is used, the Packet window can remain minimized or arranged so that only the last couple of spots are shown. The main function of the Packet window is to pass packet spots to the Packet Spots window and to the Band Map. If you don’t filter spots by using a program like DXTelnet or by filter spots directly from the packet cluster itself, all packet spots will show up in the Packet window. In this case, it should be minimized.
The Check Call Window
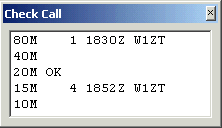
The Check Call window is an interesting window and it gives you information about callsigns and multipliers previously worked in the contest. It’s not absolutely necessary for beginners but as one gains experience and moves up into more than just casual contesting, the Check Call window can be a valuable tool, especially in contests with band multipliers. (The Check Call window was changed slightly in late 2003 with additional information. Refer to the WriteLog help file on the Check Call window). In the screenshot below the Check Window is shown below the main WriteLog window and spread out. It’s only shown this way for this pictorial. In most cases it doesn’t need to be spread out and can be placed anywhere on the screen. Toward the end of this page is a link to a screenshot that shows how the window might be sized and where it might be placed for more efficient screen space. If you have a large monitor and have room to show the complete Check Call window, by all means show the entire window.
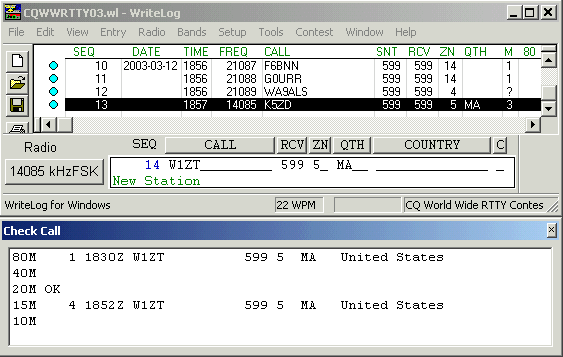
The Check Call window tells you if you have worked a station before and if so, which band. It also tells you information about the exchange information that was received from this station. In the example above, W1ZT was worked on both 80 and 15 meters previously in the contest. He was my 1st and 4th contacts in the contest and the times are given as well. The OK next to 20M means the multiplier for this particular contest was previously worked on 20 meters. It also tells me that I need this multiplier or multipliers on both 10 and 40 meters (the new Check Call window actually says “Need Multiplier” next to the band where the multiplier is needed). So if it were late in the contest, I may try to move W1ZT to either or both of these bands to get the multiplier. In this particular contest, W1ZT would represent two multipliers on those bands – Zone and QTH.
For all practical purposes, the screen can be reduced to show only vital information like this.
The Beam Headings Window
The Beam Headings window is handy to have available to know where to turn your antenna. It’s got lots of information, which may or may not be valuable during a contest. The screen can be adjusted to show all the information or just part of the information. Before you can use the Beam Headings window, you must set up the Beam Headings parameters in the Setup menu option Great Circle. (Note: You should set up the Great Circle information regardless of whether or not you will use the Beam Heading window because beam headings are now shown in the Packet Spots window as mentioned on Page 14.)
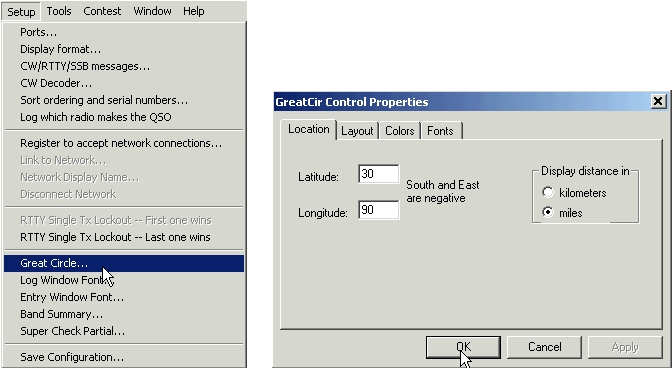
In the GreatCir Control Properties window, input your Latitude and Longitude. If either of these is South or East then the value needs to be a negative number, put a minus sign in front of the number. (The example above is for my QTH is Louisiana at 30 degrees North and 90 degrees West.) You also have the option of changing the Layout, Colors and Fonts used in the Beam Headings window. I prefer a smaller font, as I’ll show later. The Layout can actually be changed easier within the Beam Headings window itself so it’s recommended you not try to configure it from the GreatCir Control Properties window unless you want.
After you have set the Latitude and Longitude of your QTH, click OK, then make sure you Save your Configuration so the changes will become permanent in your Writelog.ini file. Go to the Windows menu in the main WriteLog window and select Beam Headings. The Beam Headings window will open.
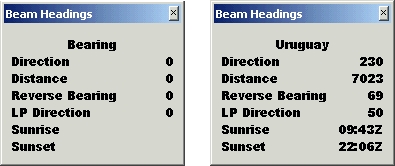
When you first open the Beam Headings window, if there is no call in the Entry Window, no information will be displayed as shown below on the left. When you enter a call in the Entry Window, WriteLog calculates the Beam Headings, Sunrise and Sunset information and displays it in the window as shown below on the right.
The information shown in the Beam Headings window is nice. However, it’s a lot of information that may or may not be needed. In some cases, you may only want certain information shown like “Direction” and “LP Direction” (Long Path Direction). How do you do that?
You can change the layout of the Beam Heading window by changing the order of the listed items. In the example above, if you wanted to see only “Direction” and “LP Direction”, you would need to move “LP Direction” up the list until it is directly under “Direction”, then resize the window. To move an item up the list, click on the item once and it will move up one line. When you have the items listed the way you want them, you can then reduce the size the window if you are trying to conserve real estate on your screen. You can reduce the window in the normal way by placing the cursor on the edges and dragging the edges in or out. You can also reduce the size of the Font so that you can reduce the size of the window even further without cutting off the information. You change the Font back in the Great Circle menu option under Setup. After changing the order of the list and the font, the screen could look like this if you wanted to show only Direction and LP Direction.
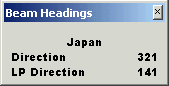
In the example above “LP Direction” was moved up below “Direction”, the Font was change to 8 instead of the default value of 9 and the window resized to conserve screen real estate.
The Band Summary Window
The Band Summary window shows a running total of your QSO’s, Points, Multipliers and total Score.

I always like to know what my score is as I’m moving along in a contest. Another advantage of showing the Band Summary window is in the case where you forget to do a
Other Windows
There are several other windows you could put on the screen if you wish. For the beginner, the other windows won’t really do anything for you. One interesting window is the Rates window. It shows what your QSO rates are for certain periods of time. Most of the other windows pertain to a multi-operator setup with two or more PC’s on a network.
Editing the Log
One of the most important things to learn is how to edit the log. In the event that you log a QSO with the wrong information, you can edit the log “on the fly” by double-clicking the item directly in the log window which needs editing. You can edit any of the fields. After you have edited the item, hit Enter on the keyboard to put the cursor back into the Entry Window.
Screen Real Estate
Screen real estate is at a premium with WriteLog when more windows are opened. Some users employ a 2nd monitor, which is great, but it requires adding a 2nd video card in your PC and will not work with Windows 95. Most important windows can fit comfortably on one screen. You can arrange the screen any way you wish and in a way you are comfortable with. Even after using WriteLog for several years, I still look for ways to improve my screen layout. Click here for an example of how the screen could be laid out to include the main WriteLog window plus the Rttyrite, Band Map, Super Check Partial, Check Call, Band Summary and Beam Heading windows.
Personally I’ve found that placing the Band Map on the side of the screen where the radio is located works better. This way as you move your eyes from the screen to the radio and back, you must pass over the Band Map screen. For contests where packet spots are permitted, this allows you to notice new stations popping up on the Band Map easier. It’s just a suggestion. There are probably a million ways you could configure your screen.
The End
This comes to the conclusion to the WriteLog RTTY Starter tutorial. Of all the tutorials I’ve written for web pages in the past, this has been by far the hardest. By not knowing what information is most important to the new user, it was a difficult project. Perhaps I went into more detail that I needed, but felt it was important to touch on the subjects I did. I hope this tutorial has helped you get going on RTTY with WriteLog. From the information I’ve presented, you should have a better understanding of how WriteLog works in the RTTY mode and what’s important to you in how you run the program.
On the next page is a discussion on RTTY Etiquette. It’s a personal opinion and observation about what is proper when RTTY contesting and what is not proper. I’d appreciate it if you read it and consider the views expressed.